Adirondack Chairs 1
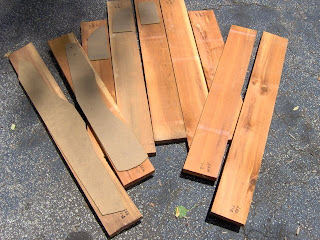
To start off this project, of 2 cedar Adirondack chairs, I rough cut 5 boards (each) for the back pieces, 2 boards (each) for the arms, and 2 boards (each) for the legs. Here is one set in a rough layout position.

Here is the other set.

Closer view of the back pieces. Laying on top are the templates that are used to mark the shape of the back pieces.

Closer view of one leg and arm. The templates for these pieces are laying on top.

Everything is cut 4-5 inches long because planing leaves "snipe", about 2 inches long, in both ends of a board. I will simply cut off the sniped ends after planing. Will be planing these pieces over the weekend. Stay tuned.

3 Comments:
These will be perfect for birdwatching. I heard hummingbirds love cedar. Looking forward to other progress reports.
Why are the ends numbered and/or lettered? Also, will you be painting these boards? The color does look great.
I'm following a plan that has a "cut list", which is a list of all the parts that need to be made.
The individual parts each have their own length and width. I'm cutting these out of very rough cut lumber which has a variety of defects that I am trying to cut around (knots, splits, strange coloring, etc).
It is a little challenging to select the best lumber to make the desired parts, and try to minimize waste. So, to make sure I have covered all the bases, each time I cut out a piece, I label what it is for future reference. It is ok to write on the board, since the writing is planed off. Indeed, you will see this in the next blog entry pictures.
As for painting, for the time being I want to enjoy the look of the cedar, so will put clear deck sealer on them. They will weather, though. When that is complete, I will likely clean and paint them.
Tim (not logged in)
Post a Comment
<< Home