Monday, February 27, 2006

A caulking we will go...

...soon.

One can never caulk enough. :-) (and it is indeed easy)

If you don't intend to do a LOT of caulking, or are nervous about buying a caulking gun, don't buy a caulking gun.

Nowadays they make caulk in convenient squeeze tubes. I think these tubes cost about the same as a larger (caulk gun sized) tube, and you get less, BUT the advantages are that they usually have a plastic cap for sealing and you don't need an extra tool.

I will do a small project soon, like caulking around a sink and documenting it with pictures.

For now, though, do any of you remember my secret "number 2" blog which contained Christmas gift info and pics? I'm putting new stuff there.

Sunday, February 19, 2006

When good washers go bad.

This is for my cousins or friends who don’t do their own oil changes.

Here is a home project you can do that doesn’t take much time or money. If you call a plumber you’re looking at maybe $75. If you DON’T do this periodically you will have higher water bills from future leaks.

A couple of weeks ago I noticed that the handles in the master bath shower were turning PAST the shut off position I had set them to the last time I replaced the washers. That was in January of 2004. This means that the washers are wearing and requiring more turn to shut off the water. Time to replace. No problem. I’ve done this a few times before. I knew that I would need:
A flat head screwdriver
A Phillips screwdriver
A rubber “strap wrench (Nice to have around the house…$5 maybe??)
An adjustable wrench or set of open end wrenches
A faucet handle puller (approx $10…and I already had one)
An “assortment pack” of replacement washers. (about $2)

I could not find my faucet handle puller tool and chalked it up to it being appropriated by the jerk who I let live at my house for a couple of months. He was a home handyman as his profession. When he moved out I’ll bet he “needed” those tools and was upset at me for kicking him out. Oh well, I won’t lose the replacement. It will be stored under the bathroom sink, where I will need it in the future.

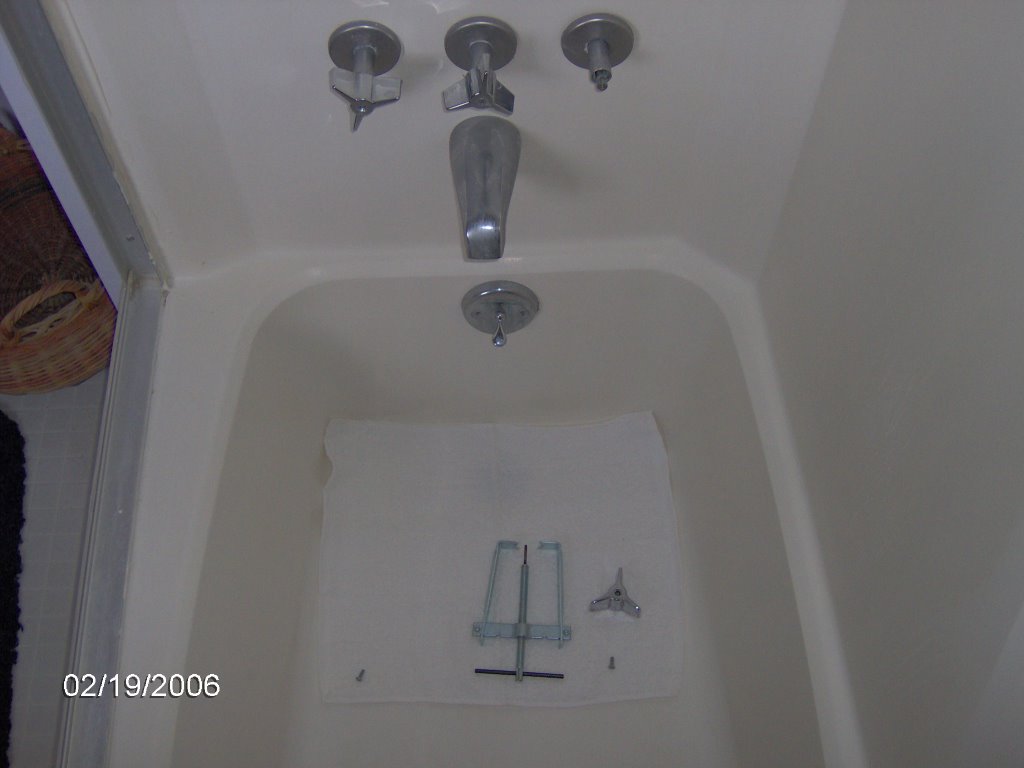
So, here we go. Put some form of cover over the drain. You don’t want to drop a screw and lose it down the drain.

Now, go to your main shutoff for the water entering the house. Turn it off. Go back to your valve and open it. In my case my valve is the cold water side of the shower. “Open it” means turn it on as if you intend to take a cold shower. There shouldn’t be any water flow because you shut off the main first. Now, go to another faucet, preferable LOWER in your house, and open that for a few seconds, then close it. This will let off some pressure in the water line.


Go back to your valve. If the valve isn't open at this time, open it...more on this later. Remove the screw from the handle and use the handle puller to remove the handle (in my case I am really going to do BOTH hot and cold, so you see an extra screw in the picture.


Using a strap wrench, remove the step trim tube and escutcheon plate. You use a tool like this because you don’t want to mar the finish on these pieces. In the past I have wrapped duct tape around jawed pliers, but then you have to take tape off and gum up your pliers. Trust me, a strap wrench is cheap and a better way.


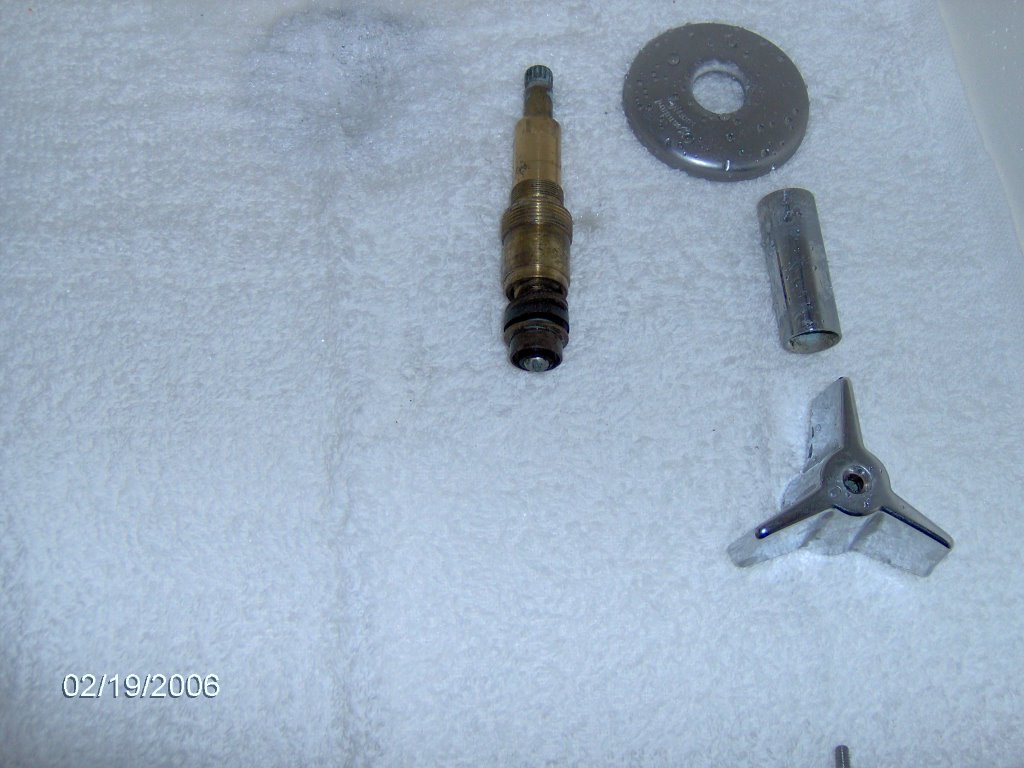
Using a CORRECTLY sized open end wrench or adjustable wrench, engage the 2 flat spots on the valve stem and remove it (Ladies: Counter clockwise. Men: You don’t need directions).


You are looking at the “business end” of the removed stem. A small screw retains the black washer which needs replacing. Remove the screw and pull out the washer. Yeah, your fingers are going to get a little black, but it washes of later.


NEW washer on the left and old worn washer on the right. Go to your assortment pack and choose a replacement washer that fits the back end of the stem. Compare that to the washer you removed and you will easily see washers that DON’T fit and which one does fit. Put the washer in place and replace the screw. Do not over tighten the scew so it deforms the new washer. Just snug the screw up to it and give another little “skosh” of a turn.


That’s what the back end of the stem looks like with the new washer in place.


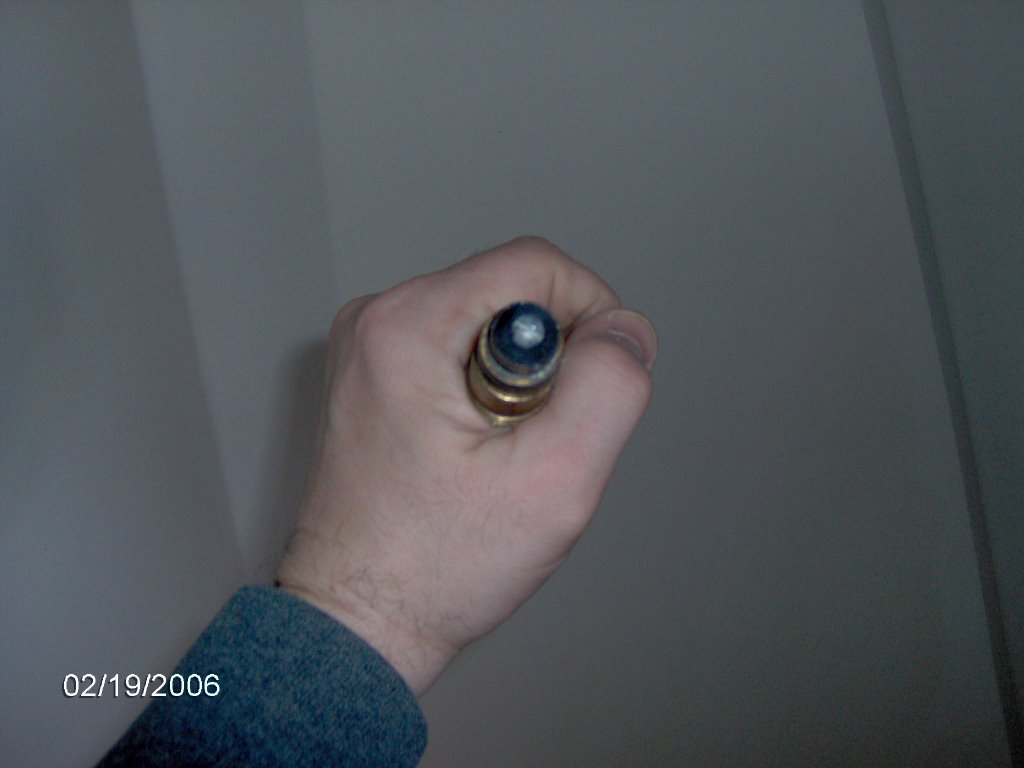
This is the part my dad likes…where I admit a mistake. WHAT IS that little piece and tool??
When I pulled out the stem another piece, called the “valve seat” came out with it, due to the friction between the washer and the valve seat. This is why I said above (before removing the handle) to open the valve. I didn’t, and the valve seat came out with it. Simple, though. This special tool is like a big Allen Wrench and allows you to remove or replace valve seats. Costs about $6. I didn’t mind the extra cost.


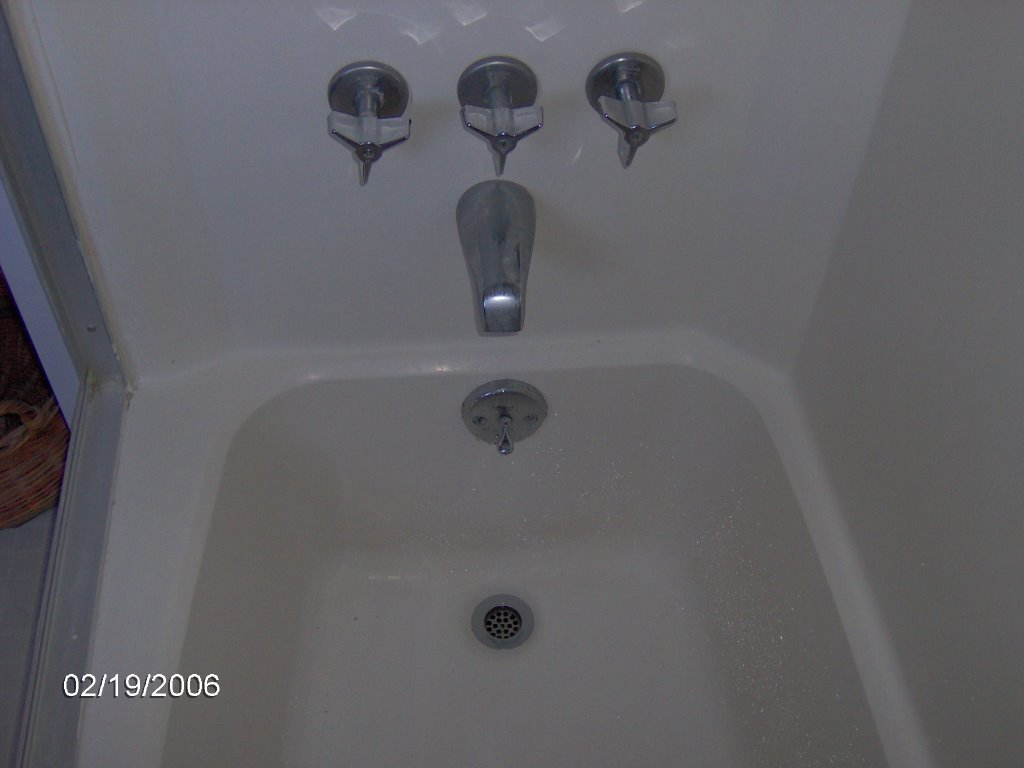
Reinstall the valve stem and snug it up tight. Loosely put the handle on, no screw, and shut off the valve. Then align the handle the way you want it to look when shut off and replace the screw. My handles all point straight down when they are shut off. If they start to look different in the future, it is time to replace the washers again. In my case, that is about every 2 years. Next time the outlay will only be about a dollar for a pack of the correct sized washers. 10 come in a pack. That’s enough to change the washers every 2 years 5 more times (10 years)…for $1. Ka-ching!! Don’t hire a plumber…this is pretty easy.

Finally, go back and turn on your main water to the house. Then go to each sink and shower and open the valves to allow any air to escape. They will "spit" a little air...don't be alarmed. Just open for a few seconds until the spitting stops then close. Do this for all your sinks and showers.

That's it!!
Oh yes, I keep a spreadsheet of common household repairs. I repeated the entry for replacing the master bath shower washers...Feb 2006. Nice little reference to have.

Thursday, February 16, 2006

Tim the "cooper"

Boy do I ever have the projects.
If you've seen my recent list you will note that I said those were just off the top of my head. Now I have more.

1. I am going to make a bamboo fountain for my son's room. To be watertight I intend to use a drywall bucket, which doesn't look at all "tropical island-like". So, to conceal that I am going to make a barrel. The barrel doesn't need to be watertight but needs to be large enough to conceal the drywall bucket. I found a website that sells a plan book, so I ordered one. The barrel will look like it came from an old shipwreck, so it will be better. Here's the pic off their web site:

and an idea of what the fountain should look like:

but picture a barrel instead of a basket...and maybe not so much leafy stuff.


2. A friend of mine has a birthday in late march. Last birthday I gave her a jar of coffee beans. For Christmas I gave her some frames (I enjoy giving handmade gifts to friends). She REALLY LOVED the coffee beans because they were chocolate cherry flavored...and she had given up chocolate for Lent. This year I thought I'd do the coffee beans thing again, but instead of a glass mason jar, why not make a small barrel?? Like this:

When the coffee beans are all gone, she can use it for kitchen utensils, or find some other use. I'm sure one of her two kids would have a use for it. Or she could re-gift with coffee beans to someone else. The fun thing about this, though is that I will make the barrel out of sycamore, which came from a tree that I cut down in her front yard.

3. As long as I'm making barrels I thought of a couple other uses...two to hold scrap wood cutoffs from the workshop. One would be in the basement by the fireplace, until it is empty. The other would be in the workshop for NEW scrap pieces destined for the fireplace. Then swap them out as needed. My current method is to use a couple of cardboard boxes. Homemade barrels will look nicer. All of those barrels will be poplar, which I have plenty of. None need to be water tight.


4. I started making Christmas gifts for 2006. Can't say what, but there will be approximately 25 of them. I ordered and received parts for 10 (the parts I can't make). In an easy evening, I cut out the wooden parts for 15, drilled the parts for 4, and did a glue-up for those 4. By this weekend I hope to have a handful of them completed!! If you're curious, give me your email address and I will tell you (so long as you're not a recipient).


5. I asked a coworker for change for a $5 bill. While she was getting the ones I noticed a small unframed picture on her desk. I told her that I will make a frame for it. She asked how much. I said "nothing." But then she said she has many 8x10 pictures that she would like to display in nice frames. So I may have found a niche making and selling frames. I wouldn't be able to put all the same detail into them as the original 10 frames I made, but they would still be nice.

Monday, February 13, 2006

Too cold and not enough humidity.

The chess boards are still unfinished. It has been too cold to work in the shop. I moved the parts indoors to see if I could work there. But the lack of humidity causes the wood to "cup." I flip the wood over and then it cups in the other direction within a few hours.

Of course, I could deal with this by gluing the pieces down to the "substrate" which I am going to do anyway. But I would really like to have everything sanded and smooth before that is done.

So, nothing to report until it warms up a bit.
Other than that, I've been enjoying some Winter Olympics.

Thursday, February 09, 2006

Anatomy of a chess board

Here's how you make a chess board...pictures are more clear than text.

Start with a light wood and a dark wood. Cut 8 strips....4 of each type of wood. Joint and plane to exactly 1/4" thick by 2" wide. The finished board will be 16x16, so allowing for a 1/8" saw blade kerf, the strips should be longer than 17 inches. 18 inches allows for a fudge factor.
My boards will be cherry and poplar...trees from my back yard.


Next glue up 4 pairs of strips...a dark and a light.


Then glue these up into 2 pairs of 4 strips.


The last glue step for now is to join those 2 pairs into an 8 strip plank.


The next part is to cut the plank into 8 strips...rotated 90 degrees. These strips need to be a little wider than 2 inches so they can be "gang planed" to a perfect 2 inches. This is where I messed up before and ran out of material, so you only see 5 strips (there is a 6th one that got left behind on a table). But for the rest of this post, imagine 8 strips.


Take every other strip and turn it around (180 degrees).


Then glue these up in 4 pairs, then 2 groups of 4, then 1 plank...same as above...and you have a chess board.


Those of you with really sharp eyes will see that I am really working on TWO chess boards. When cherry is freshly planed it is more pink. As it sits around it naturally darkens. The top four pictures are with freshly planed wood and the bottom three are the strips that I made a year ago.

Thanks for looking. Hopefully by this weekend I will have 2 chess boards all glued up.

Back on the chess boards

Tuesday, at lunchtime, I went home and tried to turn a couple of chess pieces. I had a short block of cherry, 2" by 2" by about 5" long. Using a "head to head" turning technique, I thought I could make 2 pawns out of that. So I put it in the lathe and turned the cherry round. Then I started shaping the pawns according to the plan.

Remember me saying that I am not good at using a lathe? Well, I demonstrated this once again. Things seemed to be going ok for a little while. Then the parts broke apart in the middle. You know how when you and someone else pull on the legs of a wishbone and one of you gets the bigger part? Well, that is what happened, sort of. It broke in a way that I couldn't salvage 1 of them, for sure.

I understand what I did wrong and know what I will try for the next time. What I SHOULD be doing is turning the largest diameters first and gradually working down to the smaller diameters. But what I did was start small and work outward to the larger diameters. That made the "dowel", mounted in the lathe, "weak".

So I put turning on hold until I have a nice warm evening...hopefully next week.


Today, during lunch, I went home and decided to do something that is within my grasp. Finish making the chess boards. Newcomers to my blog may not recall the fiasco of January 2005, see that post here, (thirteen months ago already?) that caused me to put the chess boards on hold. Strips of wood have been waiting patiently on a shelf. Time to work on them again.

So I planed the NEW pieces (1/4 inch thick by EXACTLY 2 inches wide). Then took them into the basement where it is warmer and within temperature for the glue (55F or higher). I glued up 4 pairs of 2 strips each...1 poplar and 1 cherry. When that is set, those 4 pairs will be glued into 2 pairs of 4 strips each (poplar cherry poplar cherry). Then 1 set of 8 strips (a picture later will demonstrate how this works).

That will look like a striped kitchen cutting board of 8 colored strips. This will be turned 90 degrees and cut into 8 strips again (where I messed up 13 months ago). Every other strip will be turned end for end, then glued together in pairs again (as above). That will leave the checkerboard pattern...you'll see.

Anyway, I made nice progress, and THIS time there is no JERK looking over my shoulder.

Monday, February 06, 2006

Inner peace...

...achieved.

Here, at long last, are pictures of the puzzle box project.


This is for my friend Ginger, who has gone through a lot over the past few years, yet has remained Curiously Strong.

The wood is cherry (from my back yard) and sycamore (from the yard of Ginger's best friend). So that makes it even more special.

The (Ginger) Altoids tin contains a few little inspirational messages, cut to fit inside. I would like to make a few more and intend to laminate them too. But the gift can be given as is.

Thanks for looking.
Comments??

Wednesday, February 01, 2006

Continued progress on the aggressive schedule

Tonight I...

Frames:
1. Installed a pair of eye screws on each frame.
2. Attached a hanger wire between the eye screws.

Remaining:
1. Clean the glass.
2. Find a paper (art supply store) that will act as a nice backing for "behind" the certificates that are to be mounted.
3. Assemble.

Puzzle box:
1. Sanded every piece to 220 grit.
2. Glued the handle to the inner piece.
3. Stained all but the inner piece.

Remaining:
1. Stain the inner piece.
2. Apply 3 coats of finish to each piece.

I can't wait to be finished because that will give me "inner peace." I may always remember the first puzzle box I made. And I may always remember the last puzzle box I made. Same box. Construction isn't so bad, but the sanding is a pain.