Tuesday, January 31, 2006

Frames: Glass install done.

During lunch break I went home and chiseled out a little bit of the rabbets in those two frames. Now the glass fits fine.

So what's remaining on the frames?
1. Install a pair of eye screws on each. (Maybe tonight)
2. Attach a hanger wire between the eye screws. (Tomorrow)
3. Clean the glass. (tonight)
4. Find a paper (art supply store) that will act as a nice backing for "behind" the certificates that are to be mounted. (This weekend)
5. Assemble. (this weekend)

Then these 8 will be done. I will trade them for the other 2 I gave at Christmas ansd make slight modifications to those two. (soon)

Progress on the aggressive schedule

I made the necessary modifications to the puzzle box, did some preliminary sanding, and glued the bottom on. Tomorrow will be more sanding and then applying the stain. If you read my first post about the puzzle box you may recall mention about a plan for that center block that normally would be discarded. I sawed that into a smaller piece and did some sanding. Tomorrow I will make a small knob to mount on top. It will fit inside the box and be a cover for the contents, adding one more "layer" of puzzle to the project. A picture (soon) will make that clearer.

I finished making the turn buttons for the picture frames and installed them. Two problems were encountered and one was solved.
1. For a #4 screw I was drilling a 1/16 inch pilot hole in the sycamore. When installing the screws they kept breaking. So, I switched to a 3/32 inch bit. That fixed the problem.
2. For two of the frames the glass does not fit into the rabbets. There is some flexing in the sycamore that is "closing down" the space. The solution will be to slightly enlarge the rabbeted area with a utility knife and chisels. It will be like doing surgery and will probably only take a few minutes per frame. That will be tomorrow night.

Monday, January 30, 2006

Aggressive schedule this week

This week I must finish the puzzle box. For sure it will take 4 evenings, tonight being the toughest involving sanding and glueing. The rest will be stain and a couple of coats of finish.

By the end of the week I expect to be finished with the 8 remaining picture frames. I'm working on the little turn buttons that hold the "glass sandwich" in place on the back of the frames. Then I need to install "eye screws" and hanging wire.

I would also like to have my router table installed in the table saw leaf by this weekend. Because I am leery about messing it up I want to practice mounting the router in scrap plywood first. Once satisfied I can move to the real thing.

Another thing. Now that the lathe is operational for turning small items I would like to start making chess pieces. I'm making a set for me and a set for a friend's birthday in July. Here is a link to the chess piece project:
http://www.shopsmithhandson.com/archives/nov_dec00/html/money_maker.htm

Should be a challenging, but fun week.

Tuesday, January 24, 2006

Project List Revisit

1. Add plumbing to the shop for the air compressor. Done !!
2. Build a cabinet that will house a wine refrigerator, wine glasses, etc. Soon.
3. Build 3 picture frames for my TKD certificates and 3 for my friend Bryan. Fall 2006.
4. Build 2 chess boards (started one last year but ran out of material). Spring 2006.
5. Fix a problem with the lathe that keeps me from turning small pieces. Done !!
6. Turn chess pieces on lathe for both sets. Spring 2006.
7. Build boxes or tables for the completed chess sets. Spring 2006.
8. Make an 8x10 sycamore picture frame for a friend. Summer 2006.
9. Complete the router table leaf for the table saw. Soon.
10. Complete the drill press table. Done !!
11. Christmas gifts. I won't say what they are, but there will be 25 or more of them. Soon.
12. There's more to come.

Another success!! Lathe is fixed.

I can't believe that this was so easy. I made a call to a metal supplier and he said that he wouldn't be able to work with aluminum. Then I took a little closer look at the strip that I had. It had a convex area where it went down the length of the steel tube. THAT would be tough to duplicate.

So, I thought "Well, I could tap here and there, judiciously, with a hammer and see if I can straighten it out. The worst I would do is ruin it, and it's basically already ruined." So I tapped here and there. In about a half hour that strip looked pretty good. Then I attached it to the tube with new rivets. It worked just fine !!

Now, the tool rest arm is a little snug in ONE area as I try to slide it down the length of the tube, but it still works. All I need to do is slide carefully, not yank on it as it slides. That's probably what a previous owner did, causing the rivets to break. (Ol' Blue Eyes would say "Nice and easy does it every time.")

So, this fix was about $5 for a pack of rivets. Now I can start making circular shavings.

Sunday, January 22, 2006

Puzzle box 1 of ?

I am making this puzzle box for a friend. In the past I have had so much difficulty with just such a box, but didn't give up. I learned how to tune up my bandsaw and this time (3rd try) I am successful.

Here it is assembled, but before sanding, staining and finishing.


How does one cut a puzzle box? Well, imagine that the picture above was a solid block. First you cut off the bottom and set it aside. This allows for hollowing later.


Next you cut out a "key" which slips in and out to hold the top in place.


Then you cut out the top, which slide off and on.


Starting inside where the key goes you then hollow out the box. This part can be discarded or used to make a smaller box later. I have a different idea for it which will be explained later.


You then glue the bottom back on. Then sand, stain, and finish.


This picture gives you an idea of the storage area of the box.

Lathe Repair 1 of ?

Here is my lathe. I know, for some of you pros this is nothing to look at, but it is (rather, will be) good for my needs. Note that the bed is a 4 foot long steel tube. More on that shortly.


On the bottom of the tube there is a strip of metal called a "key" which is damaged. To fix or replace it I need to remove the tube. This end of the lathe is called the "foot" and that came off easily enough.


On the opposite end is the headstock, motor, pulleys, etc. I thought I could disengage the tube from inside here. Nope. Turned out it was easier than I thought with a recesessed "set screw" on the back side of where the tube enters the headstock. I should have looked a little longer.


So, with the tube off and oriented so you can see the bottom, here you can see the key and how it is bent. I slipped a paper towel in between for clarity. Broken rivets allowed me to slip the towel in.


Last picture for now. You can clearly see a broken rivet here. There are 12 rivets and I think that 8 of them were broken. The "key" is more damaged than it appears n the pictures...I definitely need a new strip of aluminum (I know, I'm going to clean up all the rust too...already started).

Drill press table and fence.

Here is my drill press table and fence. Still need to make a replaceable insert system. I started to tape off where that will go.

Thursday, January 19, 2006

Various updates

1. The fence for the DP table is finished, except for any T-tracks I will add.

2. I received a new 1/8th inch bandsaw blade, installed it, and cut out a new puzzle box. The blade worked great. The box is a gift for a friend's birthday next month.

3. One of my friends asked me to give an update on Kim. She's history. After going out a handful of times I had a feeling that I was being used. You know how sometimes when you're out with someone and it comes time to pay for something and you have that little, um, struggle over WHO will pay? We never had that. She never once reached for her purse. She never once said "thank you" either. And we weren't getting closer.

Now, HERE'S the real kicker. I went to Atlanta over the Christmas holiday. When I came back I went to visit Kim. She wasn't very communicative. But I heard her on the phone with "someone" speaking English and saying something like "Are you at Lowe's?" Well, Lowe's is a typical "guy place" so I chalked it up to her having another guy on the line. OK, fine, I bow out. But then a few days later she calls me wanting to go out. I told her that I figured she took her old boyfriend back. She said yes, but they broke up again and that was 2 weeks ago. I knew that was a lie but didn't press her on it. I suspected they JUST broke up and I was supposed to be the one to spend money on her to make her happy. Well, I'm not going to be anyone's sugar daddy and I do not want another liar in my life.

4. So I went out on a first date with a very nice woman. I had a nice time and I thought she did too. But that was Tuesday and she hasn't communicated with me since. Maybe she likes me and is just busy. Just have to wait and see.

5. One of my nieces will be in Charlotte on business this weekend. I am going to drive down on Sunday, pick her up, and we're going to go to a restaurant there called "Beauregards." That should be neat.

Wednesday, January 18, 2006

DP fence progress

The fence is made up of 2 pieces of 3/4 inch plywood and 1 piece of 1/2 inch, all face glued. This sandwich is wrapped with 3/4 inch red oak strips on 3 edges. I'm not going to worry about the edge that will always be down. I applied white laminate to the front face and drilled two holes in the top oak piece for the "through bolts" that sit in the T-track of the DP table and allow the fence to be clamped down.

Tonight I can trim the laminate with a chamfering router bit.

The last thing is to install some T-track on the top. Some people put T-track into the face too, and I am considering that.

Tuesday, January 17, 2006

Started on the fence

I got the 4 larger washers and bolted the DP table to the DP. Then I spent a little time in making a fence that can slide in the T-tracks and be bolted down. I cut two pieces of 3/4 inch plywood to length and width. These will be glued together for a little beefy-ness. They will be edge banded with oak, like the table, and laminate will be applied to the face. Not sure if I will use the same laminate, or white to aid in visibility.

I marked where I will need a channel between the two pieces (slot for a retaining bolt) and cut those out with multiple passes on the table saw. The hole, therefore, is rectangular, which gives a little room for the bolt to wiggle as the fence is slid back and forth. I had read that in an article and it was easier to do than try to drill a straight hole. I clamped the two boards together and mocked it up, but didn't have bolts that were long enough. Clearly though, it will be fine. The top of the fence will have another T-track so I can add a sliding stop block.

Finally I put a small drill bit in the DP and drilled a hole in the table to mark where a bit penetrates the table. Using that spot as a reference, I need to remove some material and make replaceable inserts. These can be swapped out as needed. For example, when drilling I can put in an insert that is intended to get chewed up. When using a drum sander, the insert can have a hole large enough for the drum to sit slightly below the surface of the table. Inserts can be made for each size drum.

Fun stuff!

Monday, January 16, 2006

Another obstacle...not really.

Last night I intended to rout out the groove for the aluminum track that I bought for the router table. This one is a little wider and deeper than the T-track that I got for the drill press table. I had hoped I could use the same router and jig setup as before, but found that it wasn't going to work.

So I was getting ready to set up the jig and found that it is too short to fit on the table that I want to groove. Darn!

The picture is the jig on the DRILL PRESS table. No problem since that is not as wide as the ROUTER table.

I didn't have any straight stock milled to put together a quick and dirty solution so I put this task off. But then I thought "Hey! I have used that crappy metal router table many times now and never once needed the miter slot. I can do without a miter slot for awhile." I do want to have a miter slot because there are some cool jigs that one can build that utilize that feature. But that can be done another time. For now I can start marking where holes will go to mount the table into my tablesaw wing. And there is the bigger task of routing out the area where the router will sit in the table. That scares me because a misatake means the table is ruined. I'll need to practice on cheap plywood first.

Next I decided to mount the new drill press table to the metal one that comes with the DP. I predrilled all the holes for lag bolts, and started to bolt it in place. As I was snugging up the bolts I found that the washers were just a little too small and they started to come through the slots in the metal table that is being covered. Easy solution...add on some larger washers...which I don't have !!

So last night was a bust for getting things accomplished. And it was too cold in the shop anyway.

Thursday, January 12, 2006

Working on the shop tables

Well, if you saw my list in a blog entry below, there are many projects to improve my workshop. One is a drill press table and the other a router table. Last night I got back to work on the drill press table.

In the beginning I got frustrated because my router (which I needed for the task at hand) needed to be used freehand, but it was mounted under the cheap metal table that I got at a yard sale. One of the 3 screws that holds it in the table wouldn't budge. I tried heating the area, pressing down with all my might with the screwdriver. Nada. So I spayed the area with some stuff called "PB Blaster" which I had from the big "logsplitter repair fiasco."

Picture 1.
Here is the router table top. This is exactly what the drill press table top looks like except for length and width. A pretty countertop laminate edge banded with red oak. I cut down that oak for a friend several years ago.


Picture 2.
I made a jig a while back that is used with a router to make grooves of a "dialed-in" width. You can't see from the picture but one of the dark brown halves slides in and out and is locked in place with some knobs underneath.


Picture 3.
Here is one of the two grooves made in the table top.


Picture 4.
Then I drilled and countersunk holes in some aluminum T-track. I made the groove specifically for the T-track. Here is the T-track set into the table top.


Picture 5.
On the underside of the table there is a 1/4 inch recess made up by the edge banding. I attached a piece of plywood in that recess, but first traced the holes of the metal drill press table onto it. Bolts can be placed anywhere within those ovals for mounting this table to the original table.


Picture 6.
With this angle you can see how I beveled the edges of the aluminum T-track to match the bevel on the oak edge banding. That leaves an aluminum colored edge. It would be nice to get that back to red, but I don't think I will obsess over it.


Picture 7.
And here is how it will look on the drill press. I still need to bolt it on, make a "hole and replaceable insert" (more on that another time) and fence that can slide back and forth (and can be locked in place)in the T-tracks.

Monday, January 09, 2006

Shop reorg

I looked at my shop and was just disgusted. I am not an orderly person. Things get put down, then covered up with other things. That gets covered up with sawdust, then other things. There is not a place for everything and everything in it's place.

But I am changing slowly. More and more I am organizing. I looked at the shop and made some important decisions.
1. Things such as tools should be easier to get out and to put away. If it's not easy I just lay them down and don't do it. That leads to clutter.
2. Things that are seldom used should not be in important places. They should be more out of the way. And things that are often used (or should be often used) should be in convenient places.

So over the weekend I set to work on getting the shop cleaner and more organized, using what I have, not making anything new. Once organized I can then decide on how to make it better by making a new cabinet or drawer storage unit.

So what did I do?
To solve problem 1 above, I moved all cabinets and drawer storage for tools to the front of the shop, near the doors, and all side by side.

To solve problem 2 I moved the lathe (seldom used) to the back wall, the drill press and bandsaw (often used) and workbench (should be often used) to the wall that was just upgraded with air compressor outlets and electrical outlets.

During this process (which was a few hours on Saturday, a few on Sunday, and lunchtime today) I cleaned sawdust off every item moved and the floor where things were moved from and to.

Though not perfect yet I think it will make a tremendous difference and am happy about it. Pictures soon.

Friday, January 06, 2006

It blows !

Last night I installed all but one of the quick connectors. This morning I finished sweating the main line elbow to the vertical parts. Then I strapped everything snug to the studs. At lunchtime I went home and installed thge stub to the outside and put on the last quick connector.

Hooked up the compressor AND.... a small leak. Turns out that it was just at the packing nut below the main shut off valve handle...NOT at any of my soldered joints. It was fixed by removing the handle and tightening the nut just a little. For good measure I did the same for the other valve.

Tested again and it is absolutely leak free. Amazing. Over 40 joints and all of them worked first time. My coppering skills have improved.

Since everything is pulled away from the walls I also installed 2 more wall receptacles for future (electrical) use.

This picture shows the hole drilled in the shop wall for the stub to be installed.


Test fit of the stub, measured, then cut it to finished length.


Outside view after it was installed and the quick connect put on.


So, now let me show you the electrical outlets.

First, notice that this wall is deficient in outlets. A workshop needs more places to plug in. Power cords are not very long.


I shut off the breaker, disconnected the lone receptacle, and removed the blue box from the stud. That box was relocated to the rightmost position. Then I added 2 more boxes. Three studs apart equals 4 foot spacing.


The existing wire was 12 gauge. Black, white and bare ground. The outer sheath was white. Nowadays Romex wire is color coded and 12 gauge is yellow. I had enough left over from a previous job to do what I wanted. This picture shows the correct way to wire a receptacle that is in the middle of a circuit. Some people take shortcuts and "backwire" the two blacks and two whites. Even though that works, if a connection of the receptacle breaks (seldom) all the receptacles down the line after that stop working (series wiring). My way I use a short stub for black and another for white, connect each set of 3 with a wire nut, and attach the stubs to the receptacle. That way if a connection of the receptacle breaks, only that receptacle is affected (parallel wiring).


Finally, all the receptacles were put installed along with their cover plates. I turned on the breaker and tested each plug in spot. Every one worked just as it is supposed to. Another simple project done.


So what's next?

Well, I intend to put my work bench along that wall. It will be nice to have the ability to power my brad nailer (air tool) from above, or drills and palm sanders from the wall. No extension cords or air hoses running along the floor to trip on. I believe I will move the drill press, jointer, and bandsaw to that wall too. They often need dust blown off them and it seems right to have them along that wall.

Wednesday, January 04, 2006

"Dust in the Wind"

Last night, as I was putting together pieces for my air compressor plumbing, that song came on the radio. It didn't occur to me until today how appropriate that was. After all I was plumbing for air (wind) that would be used to blow around sawdust. And now I am reminded of how Bill and Ted demonstrated "All we are is dust in the wind" to Socrates during their Excellent Adventure.

OK, I digress.
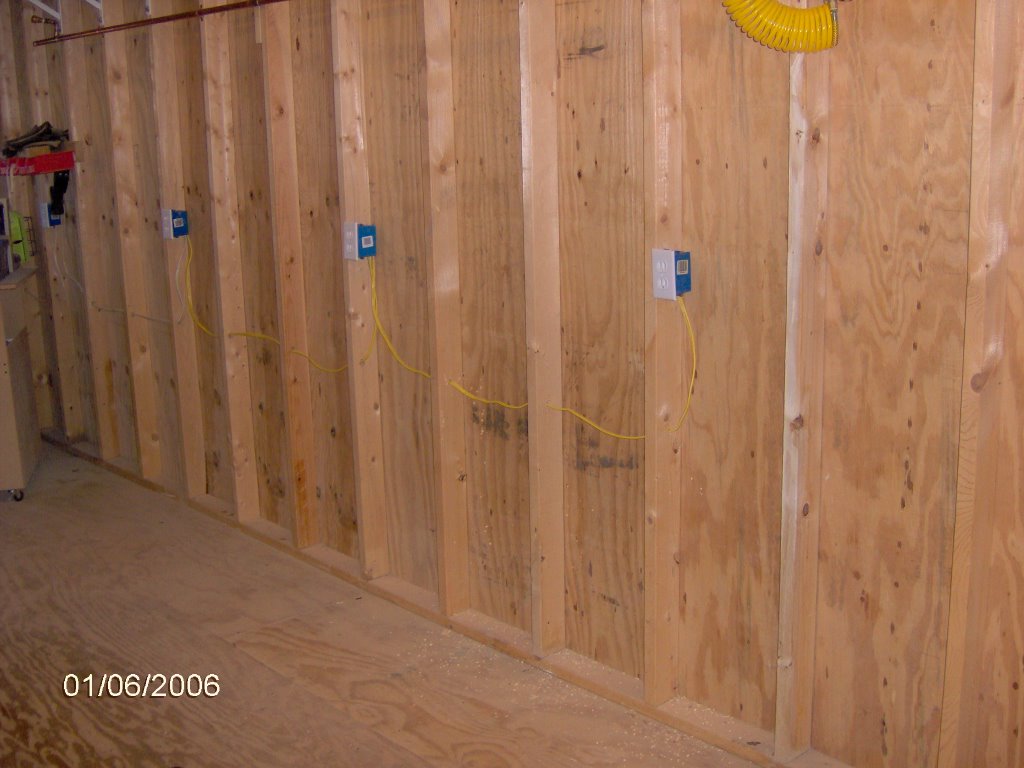
Today, during lunch, I got to go home and do some more work on this project. All of the horizontal main line parts were cut to correct length, cleaned, and dry fitted. The hard part was getting the lengths right so that things line up with wall studs. The "6 foot between drops" idea was modified so that drops would be adjacent to studs, which are 16 inches on center. So 6', 12', and 18' became 5'4", 12', and 17'4". Close enough.

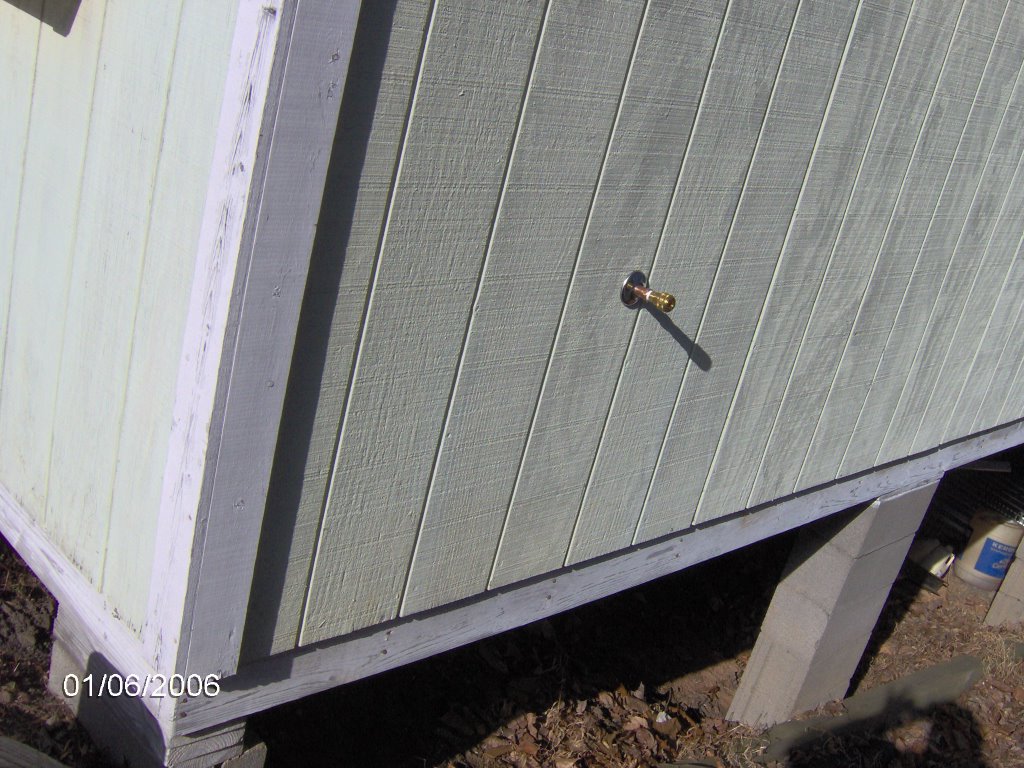
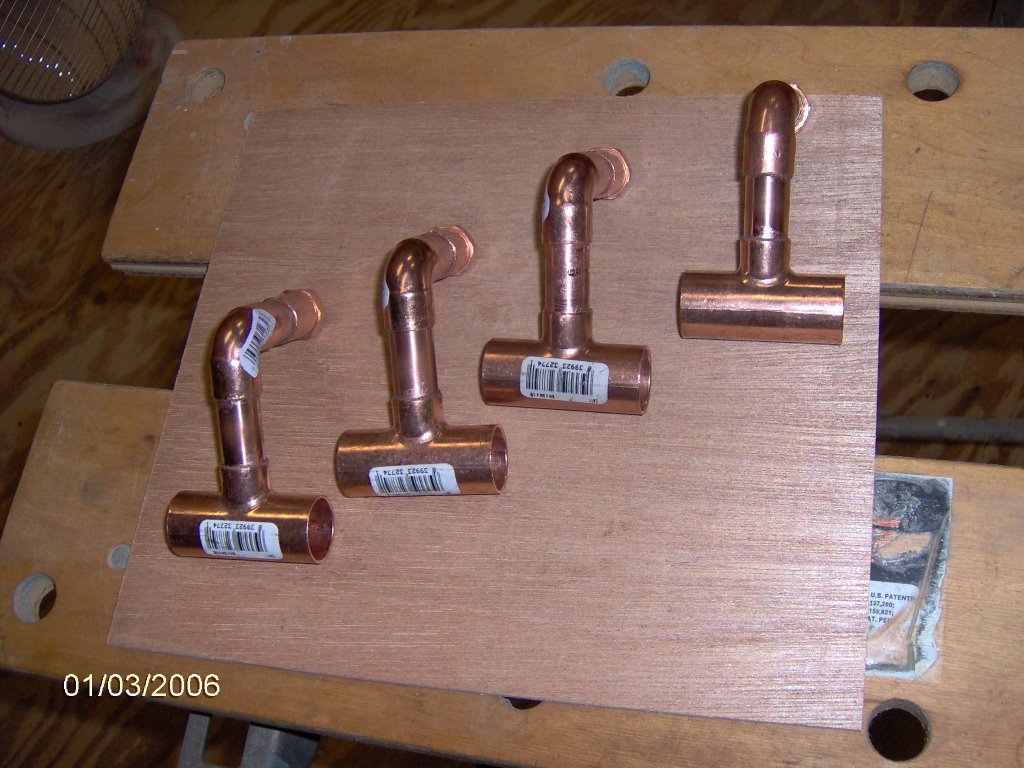
This morning before going to work I measured where the drop to the outside would go. According to my plan, it was going to end up too high off the ground for my taste. So I am going to install that part BETWEEN the two valves instead of ABOVE both of them. But, also, the part that would poke through the wall was made too short. So I need to simply make a new one. Piece of cake now.

Also, I went by a "tool fittings" supplier and ordered the quick connects and had them make up a 3 foot hose to connect the compressor to the system. The parts will be in tomorrow and I can get them during lunch. Looks like I will be finished on Friday night or Saturday.

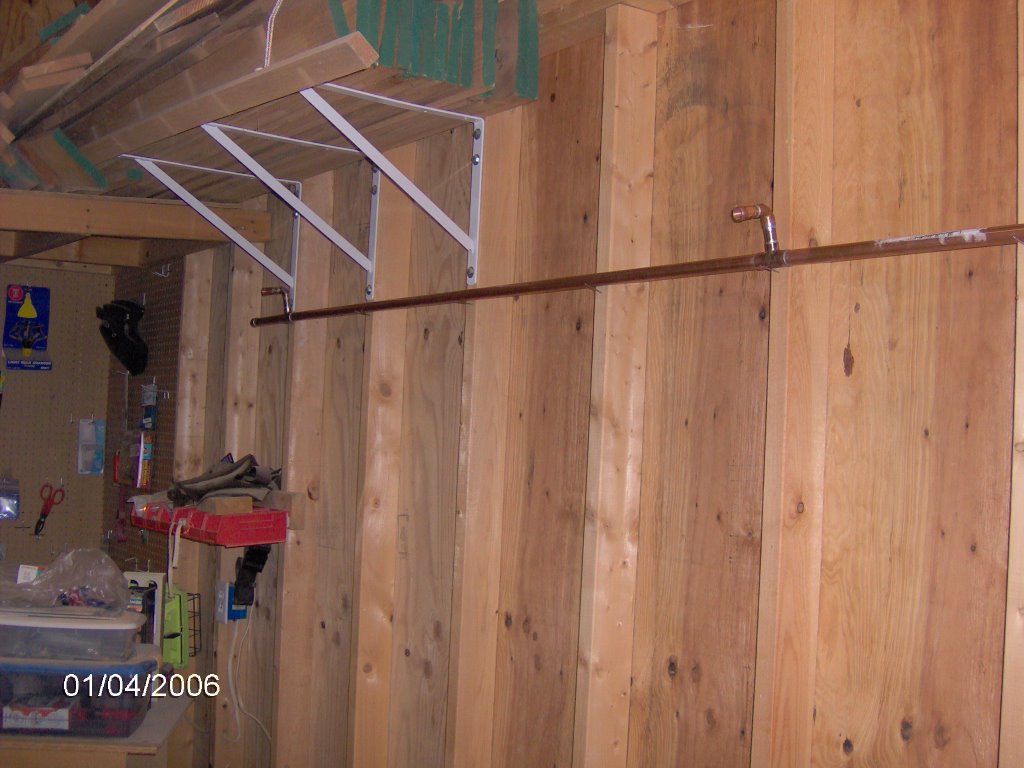
Tonight I sweated all the joints I prepped in the afternoon, mounted the horizontal run, and built the vertical run to the compressor.

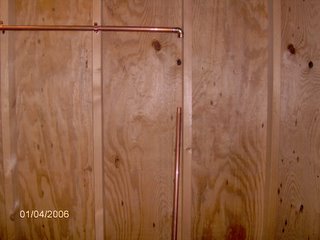
I marked the studs, then temporarily installed some finish nails in the studs to hold up the horizontal run.


Then, I soldered up all the parts of that horizontal run.


One by one I replaced the finish nails with pipe straps to secure to the wall.


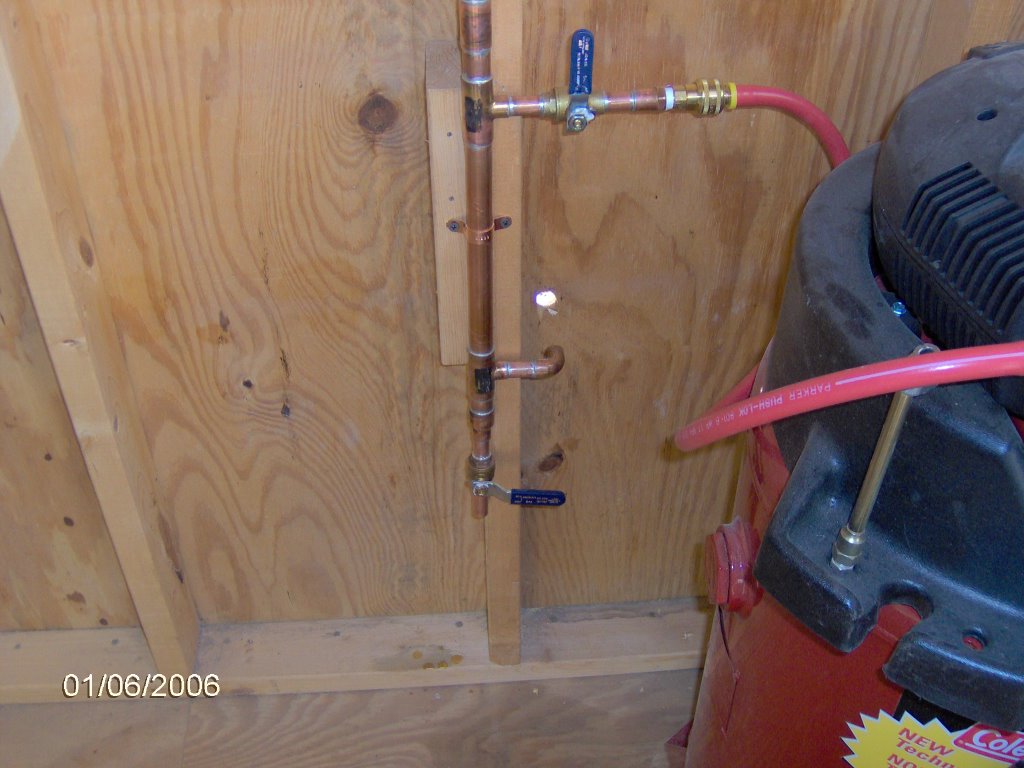
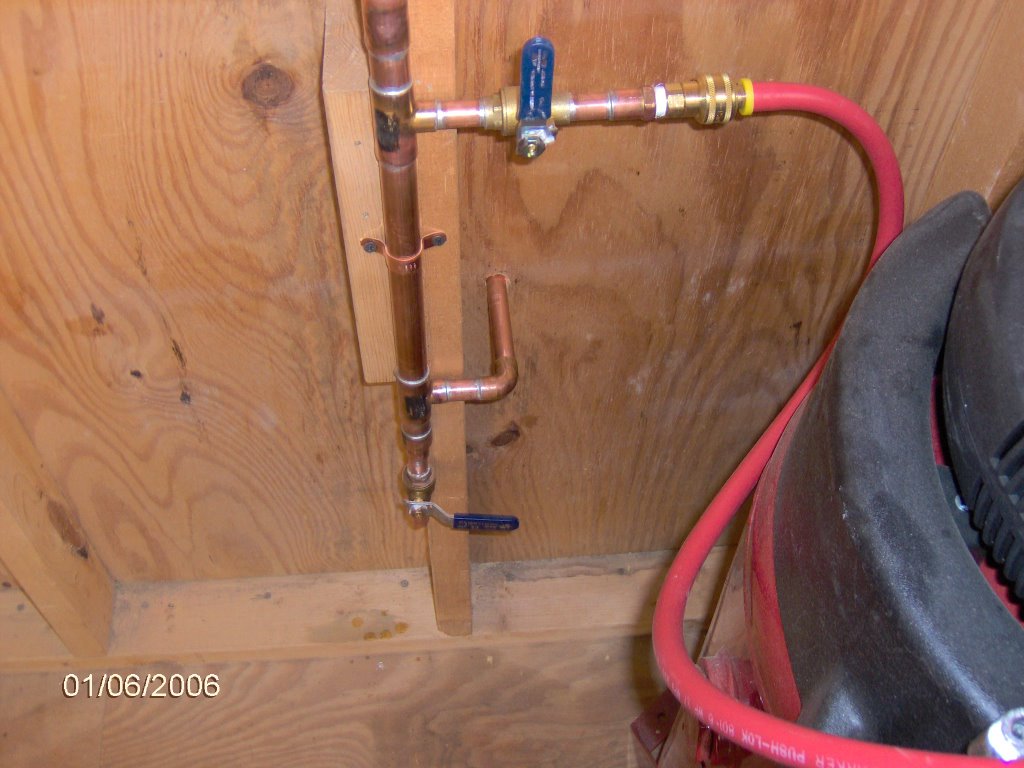
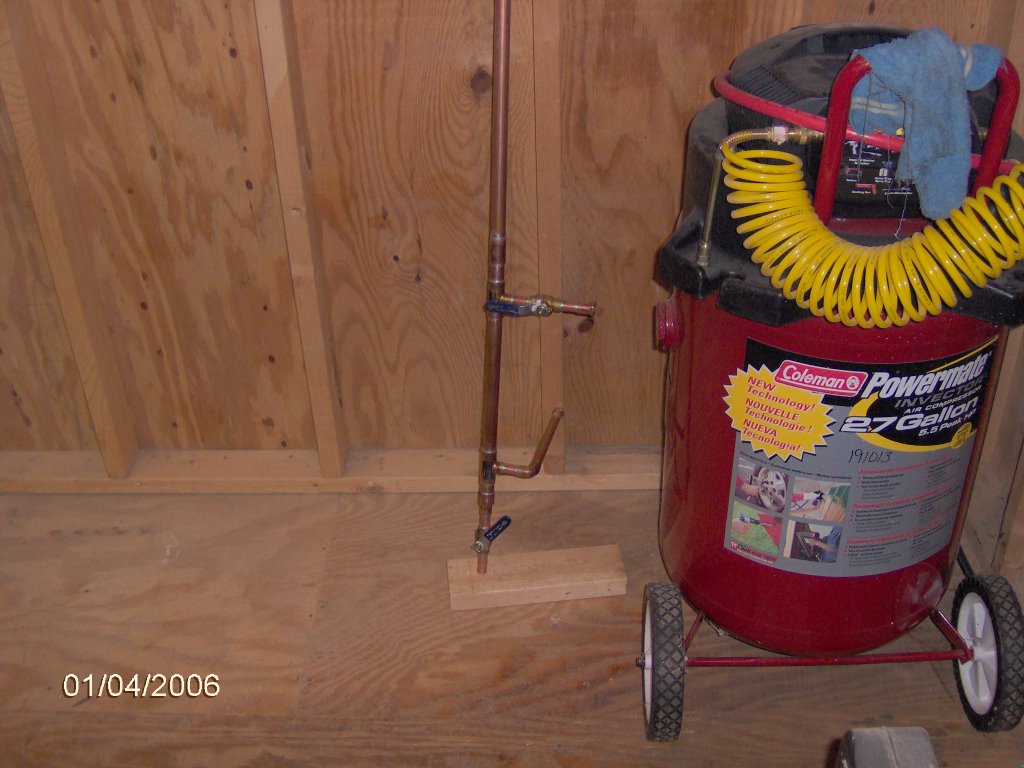
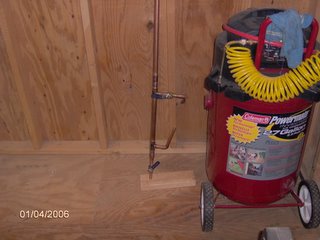
Then built the vertical run. This shows the shutoff to the compressor, which I ran to the right. Below that is the new and improved drop that will go outside. That long leg is just dry fitted for now. Below that is the ball valve for the drain.


So, just a few simple things left.
1. Pick up the quick connectors tomorrow at lunch.
2. Solder the vertical parts to the elbow above it.
3. Drill a hole in the wall for the outside drop.
4. Put the stub into the hole and solder that.
5. Tighten up all the strap screws.
6. Conceal everything with all the junk I keep in my shop.

Tuesday, January 03, 2006

Plumbing the shop for air

I have a new air compressor and have long desired to install plumbing with "drops" for various spots in the shop. So I conferred with some fellow woodworkers and got some advice. Based on the advice I am going to run 3/4 inch copper pipe through the shop, and install 4 "drops". The first one will go to the outside of the shop so I can keep a hose on the side of the building for car tires, etc. Then at 6 foot intervals I will install 3 more at just over 6 feet off the floor which allows for a 6 foot cabinet I have.

This photo is what I envision for a drop, minus the quick connect that I still need to buy. The 3/4 inch pipe gets a reducing "tee" down to 1/2 inch. This comes out the top of the pipe so moisture can drop back down to the drain when air is not used. After that there is a 1/2 inch elbow and threaded coupler into which the quick connector will go.


Here are the 4 drops, cleaned, fluxed and fit, waiting to be "sweated".


The first one was then set up in the workmate and all the joints were soldered, then cleaned with a moist rag. I inspected all the joints carefully, looking for any missed spots. Maybe I put in too much solder, but better that than an air hiss later.


This last picture is as far as I got tonight. All the 1/2 inch pipe, 1/2 inch fittings, and valves are installed. All that is left is to connect them together with the 3/4 inch main line and screw to the walls.


The above picture depicts the entire layout, but in miniature. The hose represents where the compressor will plug into the pipes. Then there is a shut off ball valve so that I can disconnect the compressor without a loud/long burst of air. Then a "tee" into the main line. Below the "tee" I reduced to 1/2 inch pipe for a moisture drain (the 1/2 inch ball valve and a reducer were cheaper than a 3/4 inch ball valve). Going up, the first thing is the "drop" to the outside. Then an elbow and a jog to the left. Then 3 more drops, then a 3/4 inch cap. The height of the main line will be just over 6 feet and the distance between drops will be about 6 feet.

I should easily be using this by the weekend.

Shop projects for this year.

1. Add plumbing to the shop for the air compressor.
2. Build a cabinet that will house a wine refrigerator, wine glasses, etc.
3. Build 3 picture frames for my TKD certificates and 3 for my friend Bryan.
4. Build 2 chess boards (started one last year but ran out of material).
5. Fix a problem with the lathe that keeps me from turning small pieces.
6. Turn chess pieces on lathe for both sets.
7. Build boxes or tables for the completed chess sets.
8. Make an 8x10 sycamore picture frame for a friend.
9. Complete the router table leaf for the table saw.
10. Complete the drill press table.
11. Christmas gifts. I won't say what they are, but there will be 25 or more of them.
12. There's more to come. This is just off the top of my head.

Monday, January 02, 2006

Back from vacation

JP and I went to my brother Duane's house for Christmas. Getting there took almost 9 hours due to traffic. We arrived at night on the 26th and came back on the 31st. There was no return traffic and we made great time.

While there we got to visit with family and had a nice time playing with all the cats and 1 dog. Duane and I worked with his neighbor to cut down 4 trees in the neighbor's back yard. While doing this I got beat up by two branches. The first hit my left hand and the second hit my right thigh. I am bruised and swollen but healing just fine. The first joint of my middle finger may be dislocated, so I will have that checked out. Will call to make a doctor appointment today.

I bought an air compressor from Tracy's husband Robert and brought it home. It is now in the shop. I want to run copper air lines to a few places in the shop, which will take a weekend (maybe this coming one). And I have many woodworking projects coming up this year. I intend to do more shop work than home improvement work this year. Soon I will post a list of the projects.

Speaking of projects Duane and I split all his firewood. We rented a logsplitter from Home Depot. That worked well, but I like my logsplitter more. Next time I will try to get mine there. The tires aren't for highway use, so I will see about loading it onto my large trailer. In the past I have hauled my smaller trailer on my large trailer, so it can be done.

We also repaired 3 bar stools. The screws going through the lazy susan mechanisms were too short and pulled out. We plugged the holes, drilld new ones and reinstalled with longer and larger screws. Debbie is pleased to have those working now. We also replaced an axe handle that was broken. A lot was done in a short visit.