Monday, September 25, 2006

Cyclone and wine cabinet progress

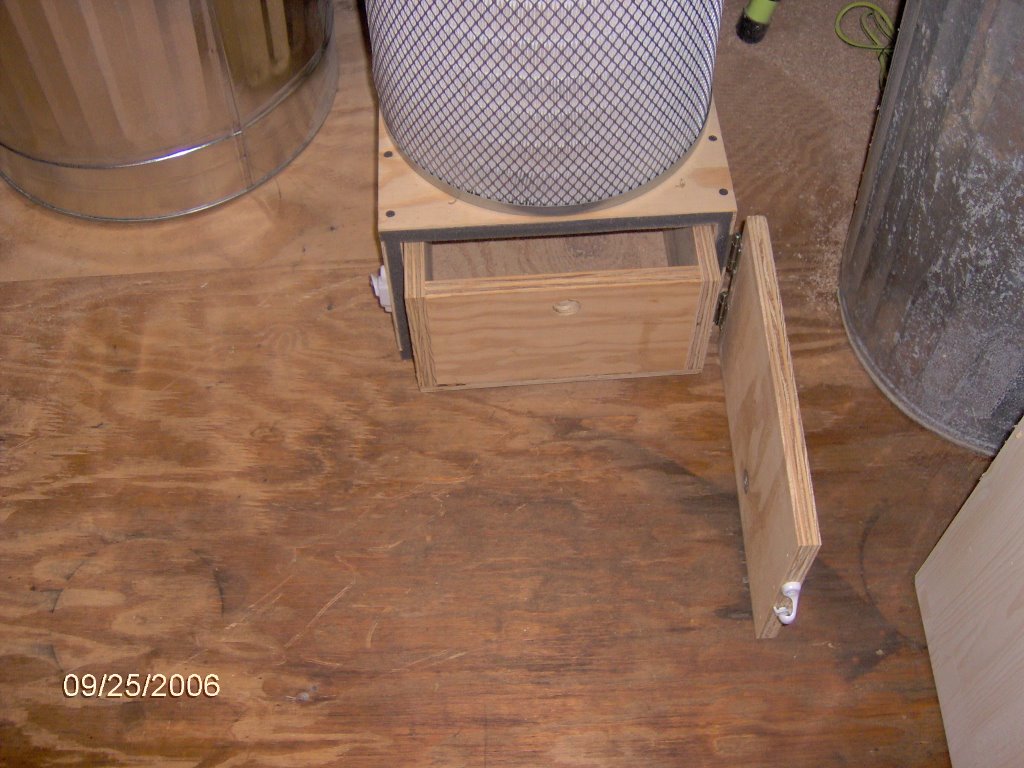
Here is the filter stack with the new pedestal box that I built. The box is screwed to the botom of the filters and the transition piece at the top is also screwed to the top of the filters.


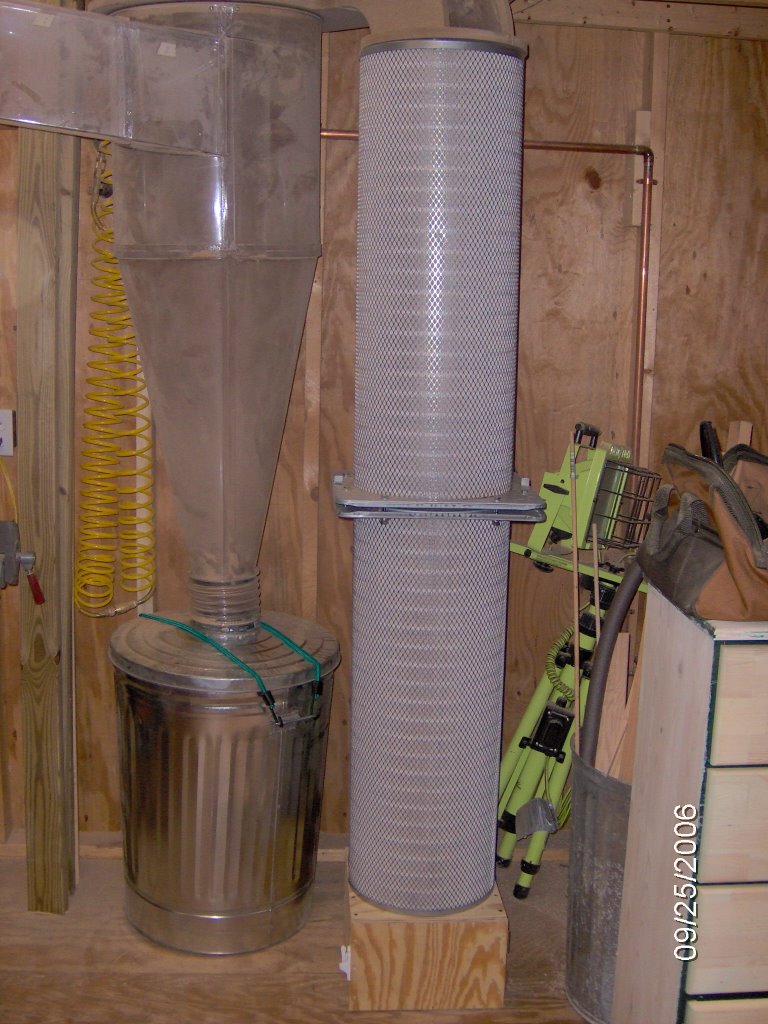
It is held closed with a window sash lock and has weather stripping to keep it air tight. Inside is a removeable drawer for the really fine dust.


All that is left is screwing the duct pieces together and caulking all the joints.


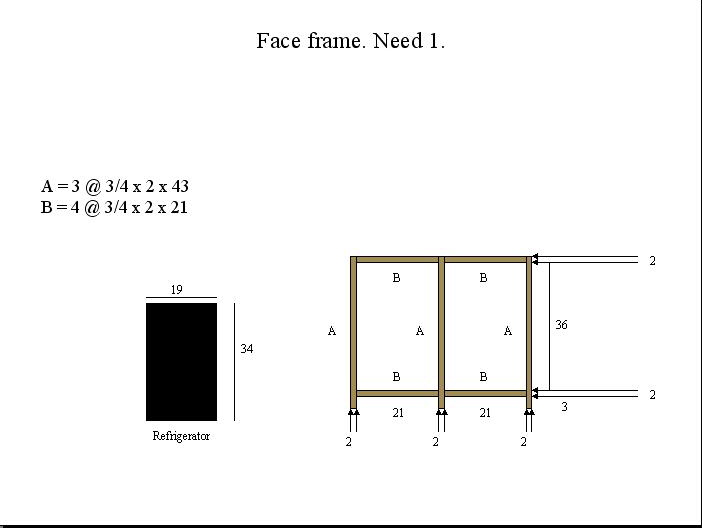
As for the wine cabinet, the following picture is the result of 6 hours of work.


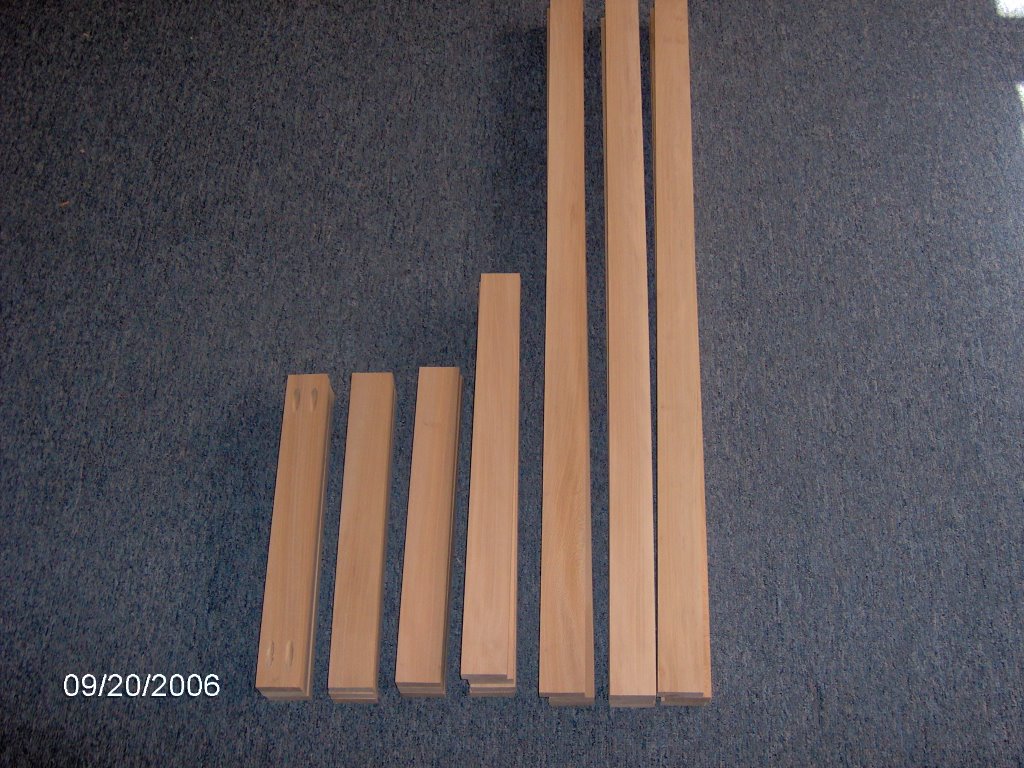
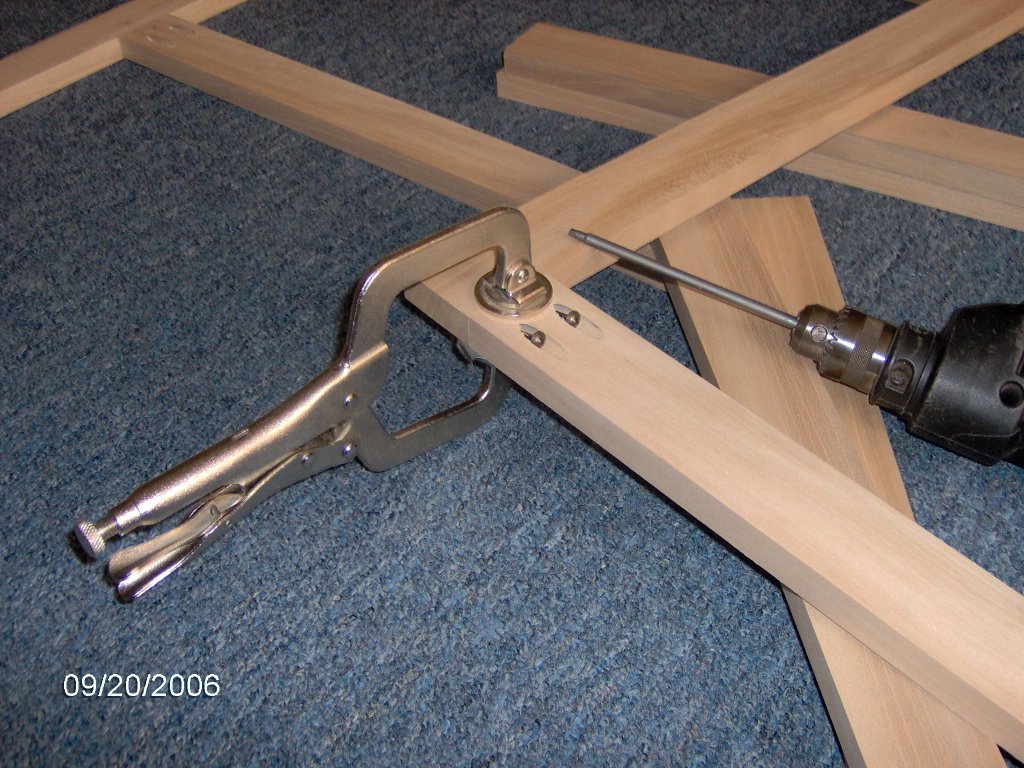
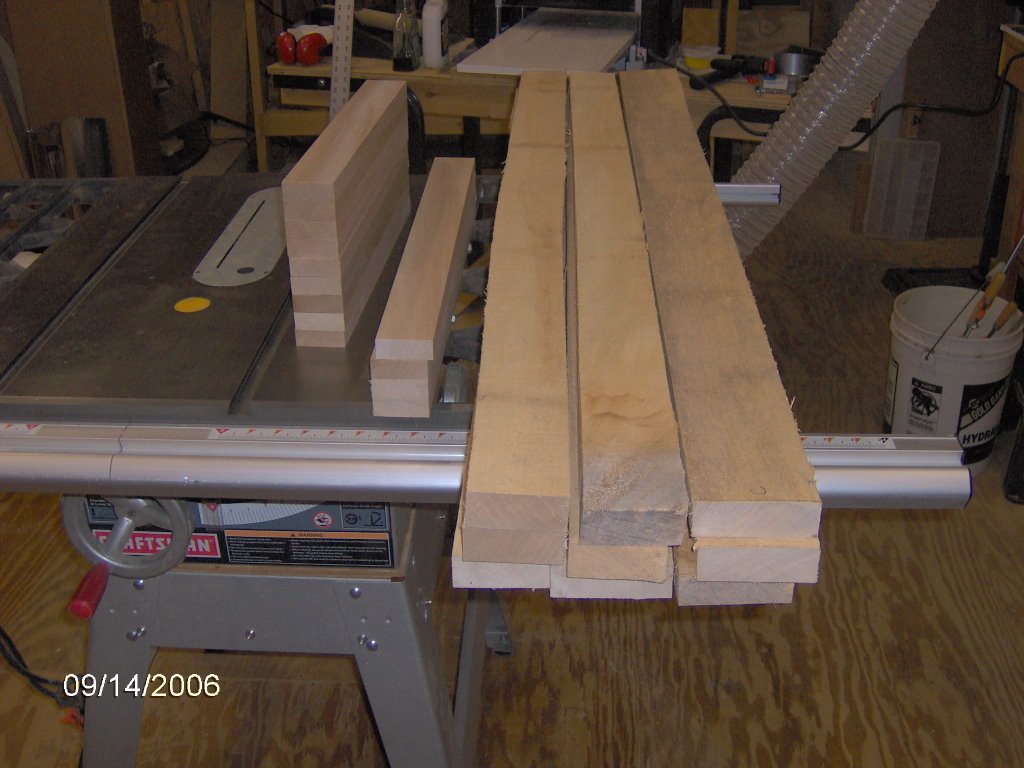
From left to right the stacks represent the panels that go into the frames, the back side frame pieces, the bottom filler pieces, and the back filler pieces. All of this starts out as full 1 inch rough sawn lumber, 8 feet long, which includes ragged ends, knots, and various other defects. The time includes measuring and marking around the defects, rough cutting oversize, trimming one edge clean, then trimming the other edge parallel to the first. Lots of planing and jointing to come. If this cabinet were to be painted then buying plywood would have been the way to go.

Currently trying to design a sled to run through the surface planer to true up one face of the pictured boards (the second face is no problem). The sled should be 48" long, hold the piece firmly, and be quick to set up since there are so many pieces. I have a few ideas. The sled will probably take a a few hours to put together once I figure out how to do it. Then I can WHIP out the pieces and it will make FUTURE projects go much more quickly (and I have plenty in mind).

Sunday, September 24, 2006

Impressed with pocket screws

Whoever invented pocket screws was a genius and should be a multi-millionaire.

I have seen projects in magazines, such as bookcases, that are contructed entirely of joints held together by pocket screws. And I was skeptical. Until I was in a woodworkers supply store and came across a display of several scraps of wood held together in various configuraions by pocket screws. There was no glue used and the joints were strong and perfectly aligned. So I bought a kit.

In my previous entry I showed just a brief glimpse at pocket screws in my project. The frames went together quickly, perfectly, with no glue mess, and without having to fiddle with finicky hole drilling for dowels. Also no nail holes to fill.

After setting up the cabinet in a "dry fit" I stepped back and thought a while. You may have noticed in the diagrams that I didn't give any information for the cabinet "floor" and the back. That was because I wasn't actually sure HOW I wanted to do them even though I had plenty of options that would work just fine. Not sure that I can accurately describe what will be done but it will accomplish 3 goals:
1. It will use pocket screws.
2. It will be strong and have perfect alignment.
3. It will utilize smaller cutoff pieces of wood that had enough defect to keep them from making up the main frames. One often has a shop full of short pieces that are still too good to throw away.

This drawing helps me. Since making the drawing I have measured all the pieces, so the "K" parts are no longer in question.

Saturday, September 23, 2006

A little backtracking

I was thinking that I was all set to continue making progress on the wine cabinet this weekend when two things happened. Had to take care of these before continuing.

First, since I was a little impatient to get started with the project, I did not finish all the details on the cyclone dust collector. I had rigged the filters into position with scraps of lumber and the filters were precariously perched. With numerous motor starts and stops they moved a bit and the elbow connector at the top fell off. So I built a plywood box to place underneath. The wedged fit is perfect but I need to buy some sheet metal screws to make a permanent connection. The box will contain a drawer (not built yet). After a few hours of use there should be some fine dust that drops into the drawer. A slight modification to the box needs to be made to make the front removeable so the drawer can be removed as needed. That requires another trip to the mother ship (Lowe's/Home Depot).

Second, while opening the garage door yesterday one of the lift cables broke. Without that the door is incredibly heavy. That was a very simple fix (for me), but required a trip to the mother ship as well.

So progress on the cabinet will continue probably tomorrow.

Wednesday, September 20, 2006

Wine cabinet plan/progress

So here is an idea of how the wine cabinet will look.

Face frame


Side and center divider frames.


Door (for Left side)


Top


Alternatively, I may end up filling in the top of the cabinet with wine corks and topping with a sheet of glass instead of tiling. Since it is for wine that would be a neat touch and very much in line with the wine cork trivets that my uncle makes.

All of the A, B, C, and D parts have been assembled into frames using pocket hole joinery. Never done that before but it makes very strong connections.

Here are all the frame parts. The four stacks on the left are rails (horizontals) and have been pre-drilled for pocket screws...see the example? The three stacks on the right are the stiles (verticals).


Here I getting ready to assemble the first frame joint.


That was done to every joint and here is the completed face frame.


And the 3 center and side frames (they are stacked up).


Finally, to show an idea of size I leaned the parts together. The center frame is sitting on top to add a little stability so I could shoot the photo. This cabinet is about one hand shy of 4 feet tall. Looks bigger in real life than in the drawings!! I have put in about 11 woodworking hours to get to this point.

Monday, September 18, 2006

Potential Toastmasters Touching Story.

In 1978 I graduated high school and that summer there was a period of time where I would hang out with my friends before going on to college classes. One day two of my good friends picked me up and we were going to just drive around aimlessly. Those two guys were in the front seats and I was in the back. When we were about 5 miles away from my home I smelled that sickly sweet smell of marijuana.

Now, to answer Aunt Paulette’s question, I was raised by Marcel and Pat Beauregard. Maybe I had a sheltered childhood compared to most other kids, but I never hung around with kids who used drugs of any kind. And if I did, I was unaware of it. To this day I have never used any recreational drugs. The only drugs I’ve had were prescribed by doctors and on a temporary basis.

But I was familiar with that smell. There used to be a guy in high school named “Herb” who had a van and drove to school. He was very popular with the drug using kids and in the parking lot you could SEE kids getting in and out of that van, and all the smoke too. Kindof funny now that I think of it that he always had marijuana and his named was herb.

I told my friends that I wanted them to stop. They laughed. They tried to coerce me to join them. I said no. And at the next traffic light I got out of the car and walked home. And I never heard from either one of them again. Until 20 years later.

At my 20-year high school reunion I saw one of them there. It was a weekend event, but the only day I could attend was on Sunday when they had a family picnic in the park. He was not officially attending the reunion but was able to take a break from work and come by. And it was a short walk for him because he was an employee of the park. Probably a maintenance man or janitor, I don’t know.

But we had a chance to talk and catch up. HE brought up that day almost 20 years earlier where they lost me as their friend. He told me that he started to take drugs and drink heavily. Before long his life was out of control and he hit rock bottom. Somehow he had gotten involved with Alcoholics Anonymous and was slowly rebuilding. As part of AA he was in a 12-step program. One of the steps is atoning for the wrongs that you do to others. This was his opportunity to apologize to me. He said that at the time he did not realize that, had we been stopped by the police, ALL of us would have been arrested, even though I was innocent. And he said he admired me for the courage I had to walk away from friends and the pressure.

That was 8 years ago. We haven’t really been in touch since. Hopefully I will see him at the next reunion.

Today I am involved in Tae Kwon Do and that gives me exposure to kids of all ages. On more than one occasion I have been able to tell that story to boys who seemed to be at a crossroads as to whether to be a leader or a follower. It may take years to know if I was helpful or not.

Thursday, September 14, 2006

Not dust free yet, but better.

I've started the first woodworking project since installing the cyclone dust collector. Not every detail had been taken care of on the DC, though. For example, I need to screw the duct pieces together and caulk all the joints. I need to make a box for the bottom of the filter stack and permanently install that. But anyway, the system is operational and does a fantastic job. It will be even better when the details are complete.

On to the project.
Aunt Lori needs a cabinet. One of things I needed to do this past weekend was take some more measurements as to where the cabinet will go. It will house a wine refrigerator and a collection of wine glasses. Because of the location requirements I also had to have a good idea of how the refrigerator door swings open. Luckily it is not mounted like an internal passage door in your hallway, and does not need additional room when open. So with the measurements solidified the project was ready to be started.

The cabinet is being made from a sycamore tree I cut down a few years ago, so it starts with rough sawn wood. This needs to be smoothed to final dimensions on all sides. First I used PowerPoint to make some drawings and filled in the measurements. From the drawings every piece gets labeled (A, B, C...) and counted. This is called "making a cut list". The cabinet is a frame and panel design and I started with the front, side, and middle divider frames...22 parts to make. Frames consist of "rails" (horizontal) and "stiles" (vertical). At this point the rails (13 parts) are all milled to their final dimensions. The 9 stile parts are rough cut, oversize, and will be worked smooth soon.

Through all of that there would normally have been about a half wheelbarrow full of sawdust to sweep up. But with the new DC doing most of the work there was about 1 dustpan full.

This first picture makes the unfinished "stiles" (on the right) look better than they really are. The finished "rails" are the two stacks on the left.


Looking down from the ends you can see the warps and twists on the stiles. ALL of the rails looked like that too, but they finish up nicely as seen on the left.


Milling wood like this adds many hours to a project, but the end result is the same as buying pre-milled wood from the store. Pre-milled wood is very expensive too and you usually only have a choice of oak, poplar, or maple. For me, there is something more satisfying about turning a tree into a nice piece of furniture.

Monday, September 11, 2006

Back from mini-reunion

This past weekend we had a mini-reunion at Aunt Lori and Uncle Bernie's place in Brevard. Tarren (Dawn's daughter) and Pete were going to be in town with little Lucas. Dawn and Mark decided to fly down too (from Wisconsin). The rest of us didn't have too much of a drive so we all converged. It was a nice weekend catching up with family.

On Saturday after breakfast I took Debbie (Duane's wife), Ryan (Karen's son), and Danny (Cheryl's son) to see a couple of the waterfalls and Sliding Rock. After a little persuasion both Danny and Ryan did the slide. The first pic of Ryan was out of focus because it was at super zoom, which I had never used before and there is a slight shutter delay that confused me, so I must have moved. So here are two pics in focus.

Danny on Sliding Rock.


Ryan on Sliding Rock.


On Sunday before lunch, and everyone departing, we took some group photos. Debbie took the pictures. Here is everyone except Debbie.


And here is my immediate family.


Karen should have probably have stood one step higher!!


And here are 4 generations...Lucas, his mother Tarren, his grandmother Dawn, and great-grandmother Pat.


I would be remiss if I didn't add to Sean's jealousy by saying that on the way there I had dinner at a Zaxby's in Asheville. Never ate at a Zaxby's before, but I seem to recall that Sean really likes them. :-)

Wednesday, September 06, 2006

Getting wired

As I type this, my electrician friend is wiring the cyclone dust collector. A couple of years ago he came and put a subpanel into my shop and replaced the inadequate main panel in the garage, which feeds the house. The shop subpanel has plenty of capability for the shop and room for expansion. Now is the time for that expansion.

He is putting in a breaker that will run the "dc". It is a 220V, 30 amp motor (I think). He will run a single wire from the panel to the opposite wall and wire in a switch. Then the wire will go from the switch to the outlet. This will allow me to turn the unit on and off easily (but I still have to walk over to it...one day I will probably add a remote control). Finally, the motor needs a wire to plug into the outlet. I probably could have done all this myself, but don't want to make mistakes. With some reading I learned how to wire the motor. The wiring can be configured so the motor runs clockwise or counter clockwise...just switch the appropriate labeled wires and bingo. I left a little note up there for him indicating the direction that I think the motor should run. If he hooks it up and it runs the wrong way, it is only a matter of switching the wiring which I now know I can do myself if needed.

The switch box is huge. I thought it was going to be similar to a normal house light switch. Nope.

As soon as he leaves I will go take some pictures.