Tuesday, February 27, 2007

I'm not wild about Bondo

Plywood has voids. Voids need to be filled and sanded before painting. Bondo is supposed to be a great filler. I used it once before, just over 3 years ago and wasn't wild about it then. Today I mixed up 2 small batches and wasted most of it, but got the job done. And I'm still not wild about it.

It is easy enough to dispense and mix up (2 parts...a filler part and a hardener part) and probably much simpler to use on big surfaces like car body panels. But I'm working with the 3/4 inch edges of plywood. Very difficult to get into the holes and smooth out without slopping it all over. Then, when I'm about happy with the batch I mixed up and holes that I've filled, it is too hard to work with. You only have a few minutes to work with it so small batches are the way to go.

I know I will be happy with the end result after sanding, applying more filler, and sanding some more. It's the process that is a pain. I have a lot of respect for the people who can fix dents in cars using Bondo and make the fixes invisible, or nearly so. They are artists.

Friday, February 23, 2007

Boat bookcase 4

Now it's starting to take shape. I fashioned the shelves and attached them to the back. This is a temporary fitting. The squared off ends of the shelves need to be sanded down to match the curve of the bottom (back). Then I'll remove the shelves, paint them and the back, and reinstall. I believe it will be easier that way.


In case you are wondering, yes, that is a modified grill cart that the boat/bookcase is sitting on. It is pretty heavy now and I want to be able to move it in and out of my garage. I built this rolling workshop cart, over a year ago, from a grill after having discarded the deteriorated kettle. Normally it is used inside the shop for a miter saw and thickness planer.

I'm soliciting opinions on how to paint this. I am thinking of red for the inside of the back and maybe white for the shelves.

Wednesday, February 21, 2007

Boat bookcase 3

A little progress was made. Using a circular saw I rough cut the shelves from the piece of plywood. Then took those to the table saw and trued up one long edge. Will cut them to desired width soon. Then I maneuvered the large back piece through my bandsaw and cut closer to the line. Spent about a half hour with a belt sander trying to get the line to disappear and leave a smooth edge. About another half hour should do it.

If I were a professional woodworker AND I were going to make more than one of these, you can bet I would not be using a belt sander like this for each one. A pro would make a GOOD "half boat" template out of something like Masonite. That would be clamped to a sheet of plywood and cut out with a router and a pattern following bit. Then the template would be flipped and the other half cut out the same way. In that manner one can make as many perfect copies as desired. BUT there is still time spent in making that first perfect part.

When the back is done I'll set the shelves in place and mark them to ease the ends so they fit the curved profile, then they will be screwed to the back. Plywood has voids and they will need to be filled before any painting can be done.

No pictures this time since the camera wouldn't pick up the subtle differences.

Friday, February 16, 2007

Boat bookcase 2

Roughly cut the back (bottom) out of the sheet of plywood. Now it will be easier to handle. The height is just under 6 feet (70 inches). Width is 28 inches. Depth of shelves will be around 11 inches.


Thinking about this, there is no reason the back needed to be 3/4 inch plywood...silly plans...who needs them? Most furniture/cabinetry has 1/4 inch plywood on the back. The SHELVES should be sturdy, of course. Once I add those shelves and sides this is going to be pretty heavy. Oh well, not going to go back now.

Thursday, February 15, 2007

Tutorial on posting pictures...

In case you have never posted a picture on your blog and want to know how to do it:

****************************************************************************

This tutorial only shows you how to upload/post one picture.
Once you master that you can upload/post a handful at a time.
Note: Keep your picture names relatively simple and descriptive.
The name of a picture file should not have spaces. Technically,
it is allowed, but you WILL later see a bunch of confusing
characters that represent the original spaces.
In the example you will see that I used "Boat04.jpg"


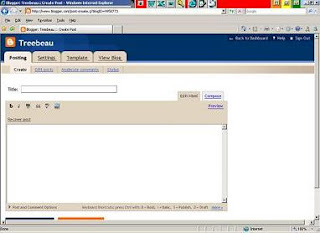
Start like you would any other post.
Add some text (like you’ll see on the next screen).


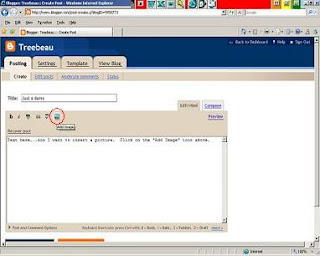
When you’re ready for a picture, click on the
“Add Image” icon (I circled it in red above).
You’ll get the dialogue box shown on next screen.


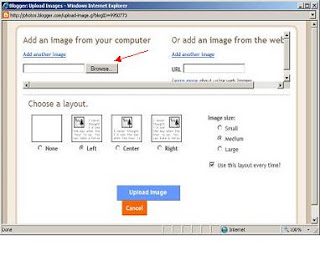
Click on the “Browse” button and it brings up
a browse dialogue box (next screen).


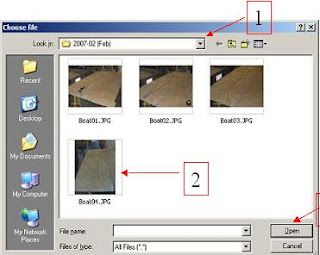
1. Use the “Look in:” drop down to find your file folder.
2. Select the picture you want by clicking on it.
3. Click on the “Open” button.


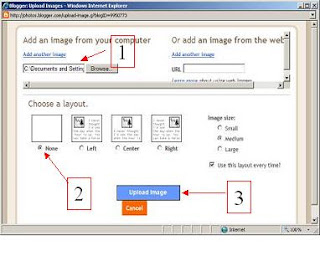
1. The path for your picture is filled in for you (can’t easily
see it all).
2. Click whether you want your picture left, center, or
right justified (I always choose “None”).
3. Click on “Upload Image” button.
It brings up a separate window as shown on next screen.


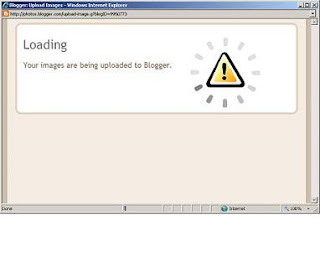
Wait for this. Don’t go to any other open windows…for
some reason Blogger sometimes screws up if you go to
other windows.
When this completes you will see what is on next screen.


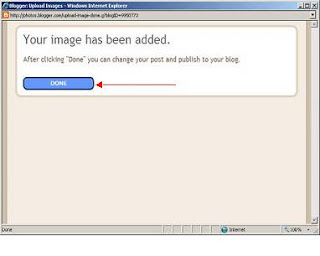
When you get to here you click on the “Done” button.
This window goes away and you’ll see your post with
information about the picture. That information is a
LONG string of what is called “HTML code”.


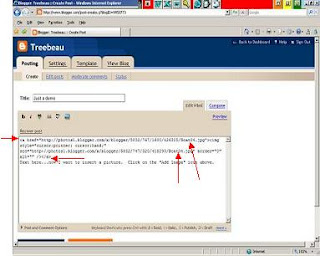
The HTML code starts with "(a href" and ends with
"(/a)" (horizontal arrows above).
It always gets put at the top of your post. You need to cut and
paste the ENTIRE thing to wherever you want the picture to go.
Note that there are TWO references to your picture.
One is for the normal size and the other defines the size that
a blog reader sees when he/she clicks on the picture.
NOTE ALSO that you have to use "<" and ">" above instead of "(" and ")".


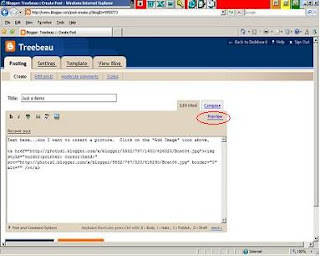
If you want to get an idea of what your blog looks like
before posting it, you can click on the “Preview” link.
(See next screen)
This helps you to add spacing for visual appeal.


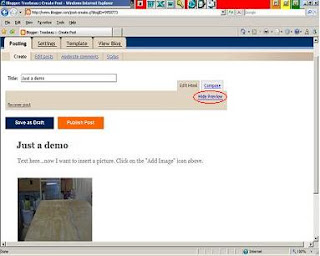
You can’t do any editing from here so click on the
“Hide Preview” link to go back into edit mode.
If you’re not done, I recommend to “Save as Draft”
to be on the safe side, then Edit it again. Sometimes
things go wrong and you don’t want to lose all your
hard work to this point.
When you’re all done and happy, click on the
“Publish Post” button as usual.

Wednesday, February 14, 2007

Starting the boat bookcase

Finished the shoe molding.

Starting the construction of a boat bookcase. I bought the plywood and laid it out on sawhorses.


Then made a rectangle for max height and width (28in x 70 in).


Divided this up into 5 sections of 14 inches for shelves. Made a centerline and measured out from that for critical "pin points". For the image I marked those points with yellow dots and connected them using MS Paint and the curve tool.


Drove some nails slightly into the right side points and using spring clamps and a piece of shoe molding I traced the right side. Found that this hung over the rectangle by 1/4 inch, so I moved all my pin points over by that amount and traced both sides. Darkened that with a Sharpie marker. Now I have the bottom (back) that can be cut out.

Sunday, February 11, 2007

Update to the aggressive list

Today I nailed on the last piece of shoe molding in the living room. The hall and dining room were done on Thursday and the living room will be done on Wednesday with a little touch up paint over the puttied nail holes.

Next up was to build 4 end tables. The weather is cold and not affording me much shop time. So I've moved up the boat bookcase project. No wood to plane for that...it is all plywood, screws, and paint.