Wednesday, June 27, 2007

Part 4: Pretty tools and boxes

Continuing on.

I made a dumb mistake that set me back a little. The 4 part frames for the boxes were a little bit off in the corners. I tried passing them through the thickness planer to true them up and ended up making a tear-out mess. Very unsatisfactory. So I carefully cut out the torn up pieces, made some replacements, and glued up new frames.

Then I glued up all 6 panels to make the tops and bottoms of the 3 boxes. These were planed to 1/4 inch thick. I have glued the bottom onto all 3 boxes, trimmed them close to exact, and trued them up with on the router table using a straight "pattern" bit. This bit has two cutting edges that are lined up perfectly with a bearing. The box side runs along the bearing and the cutters remove the excess. Does a GREAT job.

Two bottoms done and getting ready to do the third.


Shows the pattern bit in the router table and the wood to cut off.


All three bottoms done.


Next was to glue on the tops and then do the same router magic. Look how many clamps it takes.


So like mentioned before they now look like cigar boxes that can't be opened.


Then some sanding, then cutting the tops off. There is a method to cutting boxes. First, do the two ends, then tape the ends and put shims into the saw kerf, then do the front and back.
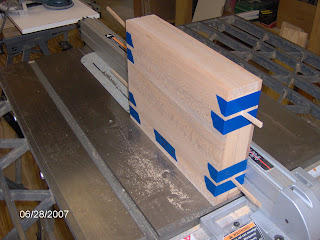

Works like a charm if one keeps the same face of the box against the fence for all four cuts AND does not move the fence. ALMOST made that mistake.


Next will be more sanding, staining, and then finishing. Still need to work on the tray inserts a little (bondo/filler/grinding/smoothing) then install and spray in the flocking. Probably a few more easy days and this will be done.

Thursday, June 21, 2007

Pretty tools and boxes, Part 3

Continuing the saga.

I'm making 3 boxes, so I turned 3 "stencils" into 3 "trays" by gluing a piece of plywood to the bottom. It doesn't matter what this all looks like right now because it will be covered with flocking (received the Kelly Green flocking stuff and I think it's going to look nice). Also, I realized that the "chipout" of the plywood can be fixed with Bondo, ground, and sanded....since it's going to be covered up with flocking.

Next is to make the boxes, which will be made like a sandwich. I'm going to start with the filler and then work on the bread. The filler is 4 pieces of wood glued up into a rectangle. I want this to be just a little thicker than the thickness of the "tray" and the thickest tool, which is the tape measure. I started with 2 inches but will reduce that down later. All of the wood is rough cut, air dried lumber. There are many steps in rough cutting, planing, truing, etc until it is useable, and all of this is repeated for the 12 pieces for the 3 boxes.


All parts are milled down to 1/2 inch for lightness, then cut to size and glued into the rectangle.


Then the tray is cut to fit into the box and fastened in place.


Next I milled the wood to be used as the "bread" (top and bottom). These have been glued up into small panels and now I have to cut them to size.


After these are glued on the boxes will look rather like cigar boxes that cannot be opened. They will be passed through the saw on all 4 edges to separate them into box tops and bottoms.

More to come.

Sunday, June 17, 2007

Thank you very "mooch"

Many years ago I got my dad a Father's Day card that had Ziggy on it. Ziggy said something like "Dad, I have been mooching off of you all these years and just want to say..." and you open the card and it says "Thank you very mooch."

A few years after that I got another card. In fact, it was the exact same card. I thought it was funny the second time and really did not recall the first card. After opening the card, Dad went to his room and came back with BOTH cards from me, exactly the same.

So the following year I made a joke out of it. I got copies of the exact same card again and sent them to my sisters and brother and every one of us gave the same card to Dad. I think that went over pretty well.

Everyone knows how good natured and funny my dad is. Everyone knows his laugh and they want to know what was said that made him laugh like that. When he's not around someone may say "You know what Marcel told me?" and all heads will turn and the room gets quiet, like all of those old "E.F. Hutton" commercials.

The thing I appreciate most about my dad is receiving his desire for learning. He reads text books when others read novels. And I notice that no matter where he is he can hold a decent conversation with pretty much anyone in the room. And the really neat thing is that it is on the level of the other people. He can converse with a 10th grader having trouble in math and not make it sound like he is talking down to him. That is an incredible talent and one that I try to emulate. I don't know how well I do, but I have years to keep at it.

So, Dad, I love you and thank you very mooch!!!

Thursday, June 14, 2007

Just some small things

Haven't made any real progress on projects that are in the works. But I've been doing a few small things that add up.

1. Last week a friend of mine wanted to buy some pens from me to give as gifts. She wanted them from the wood of a tree that I cut down in her front yard. I didn't have any ready (she needed them the next day), but I have plenty of the wood and had given one of these to her and one to her daughter in the past. So I told her to give the pens she already had and I would make replacements. She made me promise that I would replace them because they were so dear to her. So on Monday I made the replacements.

2. Yesterday I made 4 more pens (Cedar, Red Keiyaki, Teak, Sakura). I want to have a "specimen" pen out of every species of wood that I can easily get my hands on, just for show/display purposes. I made up a few more blanks (Sycamore, Cherry) but don't have the kit parts to finish the pens. Ordered 15 kits today. Over the next few days I will make up some more wood blanks in preparation for the ordered kits.

3. The output elbow on the dust collector had come loose and was not taking care of the fine dust. I thought that was going to take an hour to fix, but it took only about 10 minutes. It is snug now, but I really should fashion a special clamp/bracket that will keep that from happening again.

4. A neighbor gave me some casters to mount on the leg stand of my table saw, specially made for Sears tablesaws. The casters have been in the shop for months. Last night I installed them. They were attached to a stand he was discarding, which was taking up room in my shop...no longer.

5. One of my yellow coil air hoses was ruined by being in contact with a spinning part of another tool. When I bought that hose I had connected a "point of use" pressure reducer gauge at the end...good for dialing down pressure for a desired tool. I had to remove that from the hose and discard the hose. Then I thought it would be nice to be able to "snap" that gauge onto any hose that I want. So I had to rig up a few quick connect fittings. When assembling air tool fittings you use plumbers "pipe joint compound" to make them air tight. I knew that I had at least 2 tubes of this stuff but didn't know where. Finally I found THREE tubes in a box in the garage (with the plumbing stuff...who knew). Two of the tubes "felt" good but the holes were blocked so I threw them away. With the last tube I did all the fittings plus a quick connect fitting for a hand held air blower. Now I can use that tool on any hose as well.

So now that a bunch of small things are done I can get back to the projects. Will be taking the last week of this month as vacation so I expect to get a lot of stuff done.

Tuesday, June 05, 2007

Pretty tools and boxes, Part 2

I'm finally getting started on the pretty tools project and have about a month to get it done. The boxes are gifts for friends birthdays that have already passed, but we decided to do a get-together and gift exchange on MY birthday.

The tools were found at ACE Hardware. They are sold separately, but have the same pattern. My idea was to supply a complete set to two different "girly" friends. They can choose which pattern they like. But I will also make boxes that are form fitted and lined with flocking. The boxes will be identical.

Maybe you remember this picture of the tools.


The first step was to trace the outline of the tools (onto paper) which I taped to a piece of wood. Then, using a jigsaw and Dremel I cut out the shapes, making a template. This will allow me to make as many "inner forms" as I want, and I can save the template if I ever want to do this in the future.


I wasn't happy with this as an inner form because pieces of plywood got chipped off, but it can be used as a marking template for other inner forms. In fact, I have already traced the shapes from THIS template onto the other wood that SHOULD make the real inner forms (no pic). Hoping that a spiral cutting bit for the Dremel will do better cuts on the actual forms.

Note that the tools fit within their cutouts and there is a little space around them. Some of that space will be filled by the flocking. Since I have never done this before it is guesswork. They may not be completely snug when finished, but I think it will all work out ok.


After the inner forms are cut I will glue a thin piece of plywood to the backs to turn these form fitted "stencils" into form fitted "trays" which will hold the flocking on the sides and bottom. Then I will make the boxes, fit the "trays" into them, and add the flocking.

More soon.