Monday, June 29, 2009

Adirondack Chairs 5

Very near completion now.

I had my son over the weekend, and putting 1 of the chairs together was on our list. We started by assembling the angled legs with the two crosspieces, one in front and one in back. Then we added the vertical legs, and the decorative arm supports. At this point we paused because it was a VERY hot day.


A little later I added the arms and the upper rear crosspiece.


I clamped on a scrap of plywood under the rear crosspiece, so that the back slats could be temporarily set in place.


Once I made reference marks the back slats were screwed and nailed into place, then the seat slats were nailed in as well. This completed chair 1.


I'm pleased. It looks and feels very nice. JP posed for the picture because he had a hand in milling the wood and helping with the assembly.


Assembly of the second chair will begin tonight, but may not be completed.

Thursday, June 25, 2009

Adirondack Chairs 4

Here are all the chair parts drying after 2 coats of Thompson's Water Seal has been applied to all sides. Note the clever stacking of two 2x4 frames that I had sitting around, as well as the modified grill cart work table.


All that's left is about 48 hours for them to completely dry and then assembly. They will be put together and in use by early next week.

Wednesday, June 24, 2009

Google Reader

If you are an avid reader of my blog, you may remember (several months ago) that I had the idea for, and was working on, a program that would act like a dog going out to get the newspaper for you. I wanted something that would go to all my favorite blogs, check the date and time of the last entry, and compare it to a list that it would keep. If there were any new entries, it would let me know and I would then go check them. The intent was to save me time going to look at blogs only to find that there were no changes.

Click here to read Part 1 of that project

And here to read Part 2

When I was laid off in April of 2008 I had the time to develop the program, but didn’t know much about programming things that could interpret web contents. Once I got some of that knowledge, I had a rudimentary program working but then found my current job and no longer had time and desire to play and finish the program. That’s what happens when you work with the computer all day…you want to do something else in your off hours.

Well, apparently, I wasn’t the only one with that idea. I recently learned about “Google Reader”. From my Google mail (Gmail) page, I click on the link and it will bring to me all of the stuff I haven’t yet seen, from the sites that I put into a list.

Did you catch the difference there? It brings the contents to me...it doesn’t just say “Dad’s blog has changed, click here to go read it.” Yesterday Google Reader told me that Cheryl had a new post. Today it told me that my dad had a new post. All one has to do is build a list of sites for Google Reader to check, and that is simple.

If you want to try it out, you might need to create a Google account (don't worry, it's free). If you are a user of Blogger, you already have a Google account. Just go to Google’s home page, click on “Gmail” at the top. You may have to add Gmail as a mail client, but I have found that VERY easy to use...it will walk you through the process (for "power users": you can train Gmail to go out and bring you email from any and all other mail accounts you may have...don't enable that particular feature if you really LIKE your other email programs, though). Once you are logged in to Gmail, click on “Reader” at the top. Read the intro stuff. Then, to train it to go get your stuff, click on “Add a subscription” near the top left. (Copy and paste of a URL would be perfect here.) Put in the URL of one of your sites, and click “Add”. Repeat for all of your favorite sites.

I suggest going to play with it. It only takes a few minutes to learn, is super simple, and will save you LOADS of time by checking stuff for you.

Monday, June 22, 2009

Adirondack Chairs 3

Starting to enter the home stretch.

We're at the sanding and finishing stage now. Every piece will be sanded to at least 150 grit on both sides. The pieces where your body typically makes contact (arms, sleat slats, back slats) have all been rounded over on the edges and are being sanded to 220 grit.

I sanded several parts and Susan is applying the Thompson's Water Seal. Each piece will get two coats on each side, then will be tested for "water beading". If they need more sealer, then that will be done. I would much rather have them all sealed before assembly than have to add sealer after assembly.

I am thinking that sealing will take a good portion of the week since things have to dry, be flipped, and repeated. Also, that is some smelly stuff, so it is applied on the driveway and allowed to air dry out there for awhile, but then brought in to the garage at night.

So, here are some of the parts after sealer is applied. One is shown before sealing. Only the one side is sealed at this time (edges and ends too).


Here are the angled legs.


A few more parts.


The arms. Someone told me that these make it look like I am making an outhouse. But there will be no mistaking them when the chair is assembled.

Wednesday, June 17, 2009

Adirondack Chairs 2

Continuing on.

The 18 parts that were rough cut before were then planed. My son helped me. Here they are, still oversize, but ready to shape.


Then I shaped the back slats. I cut them to width, traced the curves, and marked the length. Cut them out on the bandsaw and then sanded to the line. They came out perfectly. Both sets are here, but one set is under the other.


Next we have the arms, front (vertical) legs, and the front cross pieces that hold the sides together.


And here we see (left to right) the decorative supports for under the front of the arms, the inner most seat slats, the lower rear cross pieces, and the angled legs. The angled legs are done in pairs so they are uniform. That takes time and only 1 set is pictured.


Still to finish are the other pair of angled legs, the upper rear cross pieces, and the seat slats. A few more evenings and these will be done.

Friday, June 12, 2009

Adirondack Chairs 1

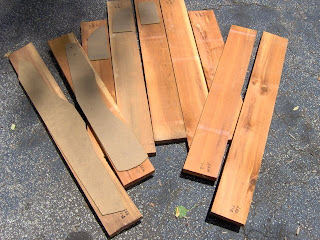
To start off this project, of 2 cedar Adirondack chairs, I rough cut 5 boards (each) for the back pieces, 2 boards (each) for the arms, and 2 boards (each) for the legs. Here is one set in a rough layout position.


Here is the other set.


Closer view of the back pieces. Laying on top are the templates that are used to mark the shape of the back pieces.


Closer view of one leg and arm. The templates for these pieces are laying on top.


Everything is cut 4-5 inches long because planing leaves "snipe", about 2 inches long, in both ends of a board. I will simply cut off the sniped ends after planing. Will be planing these pieces over the weekend. Stay tuned.

Shop Notes 3

Ahhhhhhh, cedar! Is there any nicer smelling wood than cedar?

One of the things that has been on my To Do list for a few weeks is to make a couple of Adirondack Chairs for my newly cleaned deck. I bought Norm Abrams’ “New Yankee Workshop” plan probably 15 or more years ago. I made 1 chair for myself and about 7 or 8 for a former coworker. Those were all pressure treated lumber and relatively simple since the wood came from the store already milled to the desired widths and thicknesses. (BTW, my chair sat out in the weather for many years and I finally discarded it a year or 2 ago.)

It was before I was cutting trees and keeping prize lumber. Maybe 10-12 years ago I cut down a cedar tree that yielded over 400 board feet of lumber and it has been air drying under my shop since then. Over the years I had laid down a lot of stuff on top just to get things out of the way. Now that I wanted some of that cedar, it required a lot of moving. And what better time than 4pm on a Sunday when it is hotter than Hades outside?

Anyway, several boards were moved into the shop, and most of it is really pretty. The tops of the boards look grayed, but underneath is all pretty red cedar. Once it goes through the thickness planer it will look gorgeous again. I figure that cutting and milling the parts, and then assembling the chairs may take roughly 2 weeks of an hour here and an hour there.

Yesterday I did some scanning and rough cutting. I cut the 10 back pieces out from between knots and other defects. Today I would like to get the 8 arms and legs roughed out as well. I'll plane and shape those 18 pieces over the weekend. Then will start on the 6 cross pieces and the 10 seat slats (which don't have to be as carefully selected).

I will take and post pictures in a couple of days.

Monday, June 01, 2009

Shop Notes 2

The 6 oval boxes are well underway. Over the weekend I shaped the strips (bands) for the lower and upper box parts. These were soaked in hot water for over ½ hour. The newly painted water tray performed perfectly (and this time I emptied the water out to keep rust away). The strips were formed into ovals around their foam forms, and hammered into shape with the copper tacks. After 2 days I took them off the forms. I then prepared the thicker material that makes the box tops and bottoms. These were cut and milled to their respective thicknesses. Last night I traced the ovals, cut and shaped the box bottoms and tops, and installed the bottoms. That is done by drilling through the thin bands into the thicker bottoms, then rolling toothpicks in glue and tapping into the holes. At lunch today I trimmed the excess toothpicks and sanded them flush. Next will be to repeat that process for the tops and sand the boxes.

In case you haven’t seen the oval music box project from last year, here is the link:

Click here.

As often happens, while I am working on one thing, something else pops up. This time I got a card from a niece in California who is graduating high school. I had already made her sister a cherry pen (from a tree in my backyard) a couple years ago when SHE graduated. So I thought it fitting to make another pen for this graduate. Would be nice if I had a little stockpile, but as with the oval boxes, my supply of cherry pens was zero. However, months ago I started preparing to stockpile some cherry pens and had already worked up the blanks for 2 pens. Last night I turned and finished one of them to send to California. At lunch today I shaped the second one but have not finished it. Hopefully, I won’t be like Michelangelo and leave a bunch of unfinished works when I die.

While driving, it occurred to me that if I don’t get working on it SOON, 2010 will come and go before I finish the restoration of the mahogany upright piano. Not sure if I have blogged about it before. The piano was given to me by someone who had it in their basement for years. It looked sound yet required some cosmetic touchups. I found a web site dedicated to piano repair and restoration and started. That was years ago already. The piano was built in 1910 (again, searched the web) and I would like to have it restored some time in 2010 when it is 100 years old (and have a party with a professional piano player). If I blogged about it I will find the link. Anyway, the sound board and harp were good. Most of the hammers and keys were good. A few repairs are needed that I can do, but aren’t trivial. Lots of felt to replace. Need to strip and refinish the cabinet. It’s a big job but I still have a little over a year (thinking that Michelangelo thought again).