Monday, September 26, 2005

"Bam-boom"

Several weeks ago a friend asked me:
"Do you know why bamboo is named bamboo?"
and I had no answer. The answer was:
"Because that's the noise it makes when it burns."

I had neither heard, read, nor experienced that. But I had no reason to doubt it. This weekend I had the opportunity to see, rather hear, for myself. I burned some brush and had some bamboo that could go on the fire. So I put a stalk on the fire and watched for a little while, then turned and did other things when all of a sudden..."BOOM!" It startled me because there's no timer counting down to zero. It just happens.

Afterward I went to look at the bamboo stalk. I saw that the entire side was split lengthwise. What I think happens is this. There are air spaces between nodes and these are separated by diaphragms which seal in the air. There is also moisture present. The heat from the fire probably causes the moisture to turn into steam and the steam builds up pressure until the walls of the bamboo can't take it anymore and explode.

Later on I did it again with another piece of bamboo. It sounded like a gunshot. I wonder if it scared the neighbors.

Sunday, September 25, 2005

Weekend update

On Friday I went to a football game. Some friends of mine have kids in the band. The football team is now something like 0-5, but this game they scored a few times and it was a much closer game. The school is brand new this year, so there is a big lack of experience. The marching band isn't really even marching yet. I've been to 3 games thus far. This game the band actually marched ONTO the field. I understand that their leader is well respected and is phasing things in because there is not one kid in the band that has been in a marching band before.

I spent several hours on Saturday installing concrete edgers along the sidewalk. Some of you may recall this from months ago (May, 2005). I did one side of the walk in May. It was uncomfortable then, so I put off the other side until now. This picture is from back in May and you can see that I set the edgers on the right side on top of the sidewalk. Along with this installation I trimmed back the shrubs. The walkway looks very nice now, but I need to rethink the plantings. Those shrubs just get too big.


On Sunday, I tidied up the house a good deal, filled some holes in the backyard with dirt, and started back working on burning a big pile of yard debris. This is done safely in a circle of granite stones that I laid down. I move handfuls of debris to the fire, sit and read, and repeat.

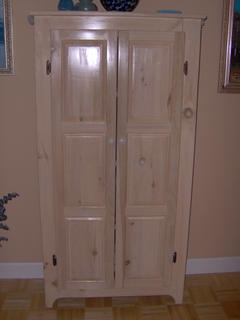
These are pictures of the cabinet that my sister likes. Perhaps in the future I will build some. The height is 60 inches, width 30 inches and depth 13 inches.


Wednesday, September 21, 2005

Minor update

The butterfly table is coming along nicely. All of the legs and apron pieces have been disassembled and all the dowels removed and holes reamed for new dowels. I've stripped a couple of the apron pieces and they look ok. May have to stain it all later.

Sent the Dremel to the repair shop. Who knows how long it will take, but I'm not in a hurry.

One of my sisters likes a cabinet I have that I use to store video tapes. She says it's the perfect size. So, I took photos and measurements of it and will send them soon. It IS a nice little cabinet. I can see lots of uses. So, maybe someday I will make duplicates.

Sunday, September 18, 2005

Anti-heckling

Hey, I'm working on stripping a chest of drawers. It's nasty and messy and takes time to do it right. Not going to post progress pictures of it because of the need to clean up, snap a pic, get messy again, repeat.

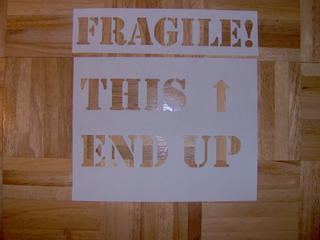
However, I did take a little time out to make the stencils for the project. I found a stencil font somewhere. Using Powerpoint I printed these out, then cut them out with an X-acto knife.


I showed them to my son and they met with his approval. He is actually wanting for "THIS END UP" to be upside down, so that's the way it will go.

Also, I started back to work on the "butterfly table" from months ago. The table parts need stripping too, so why not do it all at the same time. And there are still a few dowel pieces that need drilling/picking out. During the process I somehow tightened the chuck on my Dremel a little too much and now the shaft lock is stripped. Need to see if it's something I can fix, or send it off for repair. Doh!!

Tuesday, September 13, 2005

Transition complete

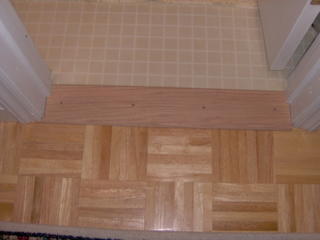
The (more complicated) hallway/bathroom transition piece is now complete. Stained, finished, installed, and caulked.
Before:


After:


Back to the stripping.

Monday, September 12, 2005

Recharged !!

Sometimes you work on a project and it just takes too long, or too much effort. And that sours you on ever doing that type of project ever again. This is how it is for me and stripping furniture.

What a colossal pain in the butt furniture stripping is. It is messy, disgusting, and can be a real health hazard (chemical fumes can cause brain damage without good ventilation). I knew this from long ago but haven't done any stripping in years. So, I though that this little chest of drawers would go fairly easily. It is taking SO MUCH TIME to get down to bare wood. And after a while the putty knives just push around the slime of paint goo and stripper.

Yesterday I was looking for a box of screws and nails and I found a box labeled "Stripping and Refinishing tools." Inside the box I found some things that I had forgotten about...Scotch Brite pads and a handle for them. I don't recall ever using them, so it must have been my ex. Anyway, there was a pad in the box that was just LOADED with dried gunk. I threw that away and have 3 more "rough" ones and 2 new "finish" ones. I went to my chemicals cabinet in the workshop and found that I have some chemical stripper that is much thinner than the pastes I have been using. So I poured some on the wood and set to it with the Scotch Brite pad and handle. To my surprise, this was the miracle I had been WAITING for.

The "weave" of the "SB" pad holds the gunk. The rubbing back and forth forces the gunk up into the weave. It doesn't just smear it around until it gets filled up. After a little while you take the pad off and go rinse it. I have 3 of them, so 2 can dry out in the sun while using the third. Using these pads I almost COMPLETELY stripped one side of the chest in just a couple of minutes. And that is down to BARE wood. No filmy goo residue. None !!

So, I am recharged and can't WAIT to finish this chest. It will be so easy now !! Sorry, no project pictures. It would take too long to clean up my hands, snap a pic, get back to work, and repeat. Will take pics of the bare chest when done, and how it is transformed to put into use.

Sunday, September 11, 2005

Weekend update

So, how did I do?

  • Continue/finish stripping the chest of drawers. MADE GOOD PROGRESS.
  • Work on the transition strip for the hallway. NEARLY FINISHED.
  • Complete the closing up of the soffit where the bees were. NOPE. STEP STOOL BROKE.
  • Shorten the bamboo window shades in the tropical room. DONE!
  • Some light touch up painting here and there. NOPE.
  • Build a simulated crate to be the base of the bamboo lamp. DONE!

I found a small bamboo wastebasket for ONE DOLLAR at a "Dollar Tree" store. I removed the bottom of the wastebasket, mounted a bulb clip to the bottom and turned it upside down. Voila!!!...instant lampshade. Well, it has an interesting look, but is too small, and it needs to be lined with paper to eliminate bulb glare coming through the slats. But I can use that basket as a pattern for making a larger one.

The crate base was fun to build. It took about 2 hours and looks really cool. I mounted the bamboo lamp pole in it. Now I need to fill up the crate with something. Stones and sand will be too heavy. It dawned on me that COCONUTS will probably be just right. Now, where can I find some??

Oh yes, I bought a water pump and some tubing to make some sort of running water feature for the tropical room. Played with the pump and a 5 gallon bucket of water to see the flow and make sure it works. Now I need to figure out what I want to build to utilize the water.

Will post some pics soon.

Saturday, September 10, 2005

Hall/bathroom transition nearly complete.

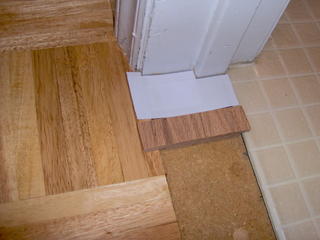
First, here is the problem. When I put in the wood floor, years ago, I had to stop at the entry to the bathroom because the subfloor there has a slightly higher elevation. At the time I did not have the tools to compensate for the change, so I left it as is.

Then, shortly after, the vinyl floor was put in the bathroom to replace tiles that were falling apart. I did not want to see the vinyl while standing in the hall with the bathroom door closed...just wouldn’t look right. So I trimmed the vinyl to the door stop and left this rectangular area of floor as is for a long time, since I knew I would have to make a custom transition to bridge the height difference and the width.

So, finally I have taken the time to do the right thing. Here is a picture of the subfloor and a strip of wood cut from the new transition piece. The strip is marked to show where wood needs to be removed to compensate for the elevation change.


I made a “test strip” which slid back and forth to allow me to ensure that the removed material cleared both wood and vinyl. I worked slowly and carefully so the "good piece" would not get messed up with incorrect tool setups.


When satisfied, I ran the "good piece" (red oak) through the milling processes.


I cut out some rectangles of paper and taped them together to make a template to trace onto the ends of the transition piece.


Using my bandsaw I cut the profile from both ends after carefully marking for length. I made it short just a smidge so it would be easy to set in place. The gaps will be caulked. I beveled the two top edges for a nice look and feel. Then I marked, drilled, and countersunk for screws, and set the transition piece in place.


The last steps will be to stain, finish, install with brass screws, and caulk the ends. Will post a final pic or two in a couple of days.

Friday, September 09, 2005

Defeating "Comment Spam"

I just learned of this. People are using blog comments as a form of advertising. It seems that the process was automated. So, Blogger came up with the defeating scheme of requiring a person to enter a random nonsense word when they leave their comment. I just "turned on" this feature. Sorry if it is confusing or a pain, but the Spam is worse.

Weekend plans.

Last night I finished the transition strips in the master bedroom. They look great and are now checked off of the "master list."

This weekend I intend to:

  • Continue/finish stripping the chest of drawers.
  • Work on the transition strip for the hallway.
  • Complete the closing up of the soffit where the bees were.
  • Shorten the bamboo window shades in the tropical room.
  • Some light touch up painting here and there.
  • Build a simulated crate to be the base of the bamboo lamp.

Not a real aggressive list, but there are other things I may add in if time allows.
Have a great weekend all!!

Tuesday, September 06, 2005

I'm in a "transitional" phase.

Now that the bedrooms are done, I'm working on "transition strips" for the wood floors. They are for:
  1. The transition between the master bedroom and master bathroom.
  2. An "end strip" to tidy up where the bedroom floor ends at the door to the balcony.
  3. The transition between the hallway and hall bathroom.


One can buy stuff like this at Lowe's. I am not that "one." Instead, I am using wood from an oak that I cut down years ago. I'm nearly finished with item 1 and 2 above. I milled the oak so that it is finished on all 4 sides. Then cut to rough size, then planed and jointed all the edges. Then, I beveled the top edges with a router in a table. I drilled and countersunk where the screws will go. Then sanded and stained. Next I will finish with polyurethane and install them.

Here is item number 1.
Before:

After:


Here is item number 2.
Before (note the ragged edge of the parquet floor):

After (edge tidied up):


Item 3 will take a little more custom work than the first 2. And I intend to take a few more pictures to show the detailed steps.

This is all being done concurrent with the strip tease (see below).

Monday, September 05, 2005

Strip "tease"

I have a 5 drawer chest of drawers that has several coats of paint. When I can I am applying chemical stripper to it, because for some reason a heat gun wasn't working. I don't like chemical strippers. They are slow and messy. But that's how it has to be this time.

So far I have removed a good deal of the paint from all 5 drawers. One of those has been followed up with a mix of lacquer thinner and denatured alcohol. This is a really potent mix that requires a lot of fresh air and protective gloves. Both of those are very thin, like water, so the mixture is brushed on and around, then wiped with paper towels.

When done, I am going to glue a couple of boards on the sides of the naked chest to make the sides look like a shipping crate. Then I will stencil on FRAGILE and THIS END UP in various places. I'll probably finish it off with a gray stain to give it a weathered look.

But for now it is slow going. I am "teased" by the look of the nearly completed drawer, but I know it's going to be a while before the whole thing is done.

Friday, September 02, 2005

Frame fix...no pics.

When I installed the chair rail in the master bedroom I didn't realize that the hammering would cause the walls to shake a bit, and that caused a picture on the hallway side of the wall to fall. The glass broke and the frame weakened. The frame has mitered corners that were nailed together with finish nails. That was ok, but not a very strong joint.

Yesterday I went to Lowe's and got some replacement glass cut to size. Then I set to work on the frame. I disassembled it and removed all the nails. Then I glued all the miter joints and set it in a frame clamp. A few hours later the glue had cured. I removed it from the clamp and scraped off glue that squeezes out during clamping.

I took the frame out to the workshop and cut 2 spline slots in each corner. This required a jig that I made a couple of years ago. I clamped the frame to the jig such that a corner points straight down to the table. Then I raised the blade so it cuts a slot that is not too deep so that it would penetrate the inside of the frame. Then I set the distance from the rip fence. The jig straddles the rip fence and I just push it along, which keeps it going straight and keeps hands away from the blade. It was then a simple matter to run 4 corners through, rotate the frame 180 degrees and run all 4 corners again.

I had some thin cherry "spline stock" laying around from a previous job. I cut 8 triangles, glued and inserted these into the slots, and clamped. This morning I removed the clamps and trimmed everything down flush to the frame. That frame will NEVER come apart again (from a fall, that is). The frame is a little rustic, so I am not going to take time to sand, stain, and finish. Just let it age as is.

It fell off the wall for three reasons. First, the wall vibration during hammering. Second, the nail in the wall was a finish nail which doesn't have much of a head to keep a picture from coming off. Third, the frame did not have a sawtooth "doodad" so that a nailhead can sort of interlock with the frame.

So, tonight I will install a sawtooth doodad and replace the nail in the wall with one that has a small head. That will make everything right. Then clean the glass, reassemble the glass/picture/backer sandwich and affix in place with small nails. Nothing major. Simple and rewarding job, really, but not for the average homeowner who does not have tools and jigs.

Thursday, September 01, 2005

New projects coming up.

Last night I finished the closet of the tropical room, so, in essence, it is done except for decorating. The "brick and mortar" aspects of all 3 bedrooms, in fact, are all done.

I started stripping a small chest of drawers of 4 layers of paint. This will be put into the tropical room, but I want to make it look like it was built out of a discarded crate. So I need it down to bare wood.

Here is what is coming up:
1. Repair a broken picture frame. A picture fell off the wall when I was nailing in some chair railing. The glass broke and the frame came loose at the mitered corners. I am going to reglue the corners and add corner splines. It will never come apart again. Then new glass and it will be done.
2. I need "transition strips" for the floors. One that will go between the master bedroom and master bath (simple), one that will terminate the wood floor at a door threshhold (simple) and one that will go between the hallway and hall bathroom (medium difficulty. I can probably get them all done in a weekend, though, except for the stain and finish.
3. A couple of outside projects...filling up some depressions in the lawn with dirt, and finishing side 2 of the front walkway. This involves removing wood edging that was deteriorating and replacing it with concrete scalloped edgers. Simple but boring tasks. Wanting some cooler weather first.
4. Should repack all the wheel bearings on my trailers. Again, cooler weather would be nice.
5. Two things in the kitchen. First, install a tiffany style lamp, which requires working in the attic (cool weather please), then replace the front edge of the laminate countertops with real wood.
6. I have in mind what I want to do as Christmas gifts for friends and relatives, so should start on those in October.
7. And, of course, when bamboo dries I have a bed and a couple of other things to make.
8. Also, for my workshop I want to continue setting up the wood stove. I built a platform, Now I need to tile that platform and fireproof the walls where the stove will go.

SO, lots of work, but I'm going to go at it one bit at a time.